This post contains affiliate links. We earn commissions if you purchase products from retailers after clicking on a link from our site. As an Amazon Associate, we earn from qualifying purchases.
After months of playing, it’s pretty normal for your drumheads to get pretty gross. I wanted to find out how to clean drumheads without having to worry about damaging them and did some research on the subject.
By the way, looking for recording equipment and musical instruments? Check out Sweetwater.com for microphones, monitors, audio interface or any other recording gear that you could ever need. (Affiliate Link)
All drumheads should be cleaned with the gentlest means possible, while animal skins are particularly sensitive to rapid changes in humidity and require special care. A tiny amount of water combined with a non-abrasive cloth will clean most drumheads, effectively.
There are some differences between animal skin drumheads and plastic drumheads, though–I’ll dive into the differences and explain what is popularly used for cleaning drumheads.
How To Safely Clean Plastic-Based Drumheads
First! Are you trying to clean your entire drumset? I talk about how to clean each part of your drumkit since they all have different needs here. Another bonus is that I stick to household goods that you are likely to have in your house.
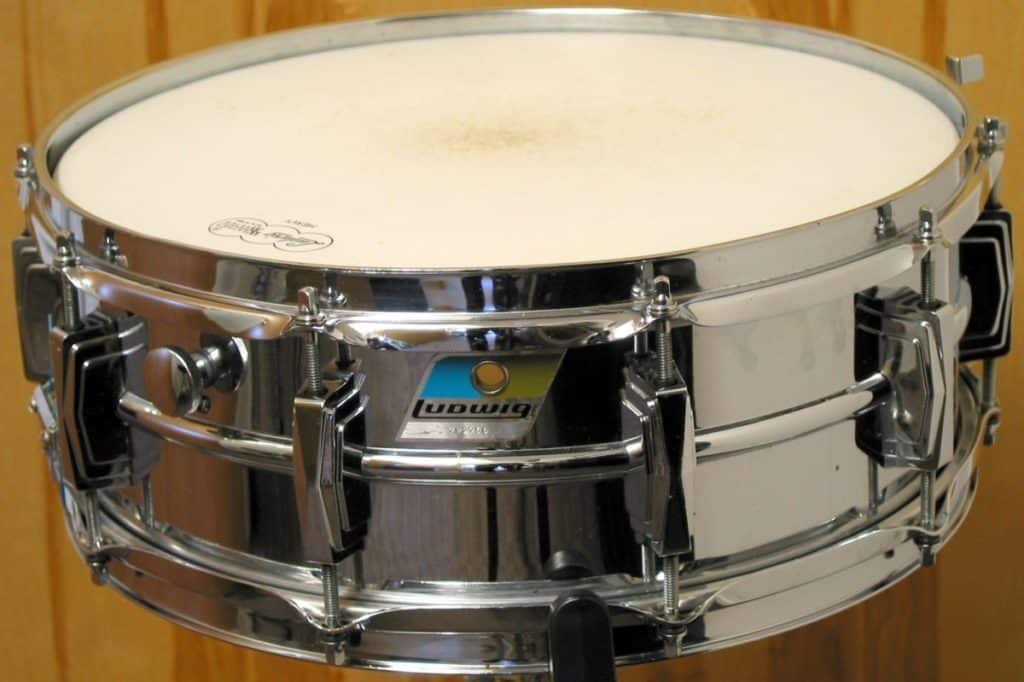
If you are trying to clean your drumset you might get stuck when you’re trying to clean up your drumheads. Drumheads on a drumset are often made of a plastic, and are either coated with a white finish or are simply a clear plastic.
Synthetic drumheads are durable, to be certain, but they do require some care.
By far the best thing to do is try the most gentle form of cleaning possible, which is, of course, a little bit of water.
- Moisten a lint-free cloth (a paper towel is okay, but it will start flaking off). The cloth should be slightly damp but not sopping–you don’t want water to get caught in the bearing edge (the outer part of the drumhead)
- Rub the drumhead in a gentle circular motion to try and remove any scuff marks.
If you find you have to add some elbow grease–pause! let’s up the ante.
The First Cleaner to Try: Dish Soap
Don’t reach for the window cleaner! In fact, you should avoid ammonia-based cleaners such as many types of Windex because they can actually weaken the plastic, if it’s Mylar or polyester or another polymer.
Instead, a couple drops of dish soap in a cup of water should be your first place to start.
Moisten your lint-free cloth in your diluted dish soap and use this to try and remove the scuffs.
The goal is to find a cleaner that is gentle and won’t force you into scrubbing your drumhead. Remember, avoid ammonia, bleach, and other caustic chemicals.
Tackling Tougher Scuffs
If dishsoap is forcing you to scrub harder than you want to, you can try a diluted vinegar. Make sure to wipe the drumhead clean as you don’t want the acid from the vinegar to stay on the drumhead and potentially damage it.
Removing Sticky Residue Off Your Drumhead
It’s super unfortunate when it happens but sometimes drums get some duct-tape on them to try and dampen the drumhead–this is effective, but if you ever change your mind, you now have a terrible mess of a sticky residue to clean up.
Rubbing Alcohol
You have some options here, the first cleaner that you can try using is rubbing alcohol. Try using 50% or diluting your 70-90% rubbing alcohol first.
Since rubbing alcohol evaporates quickly, you can very lightly moisten a rag and leave it on the sticky portion for several minutes before attempting to gently scrape off the sticky residue.
Mayonnaise
Before jumping to the stronger chemicals, you can try some mayonnaise! Mayonnaise has plenty of fat and can act as a lubricant that can help remove some stuck-on residue that doesn’t want to leave.
Other Lubricants
Goo-Gone, WD-40 or other lubricants are definitely powerful, but they may not be the best option–they will definitely work but kerosene or other oil-based cleaners may not react in a way that you want with your drumheads.
For example, in this video, this gentleman uses a type of Goo-Gone that works really well for his Remo coated drumhead but in the same video mentions that Evans coated drumheads melt with this spray.
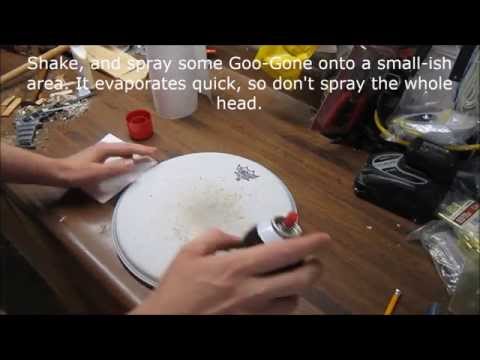
The lesson is clear: Use the gentler cleaning methods first such as dish soap or rubbing alcohol.
Cleaning Animal Skins (Bongos, Congas, Drumkit, etc)
Animals skins come with their own challenges. You can forget about using any type of cleaner or solvent that you wouldn’t use on your own hands since, ultimately, the drumhead is just that! Skin.
I talk more in depth about cleaning bongo drumheads here in this post if you are looking at cleaing your bongo drums.
Now, you can use a water-moistened rag like you can for synthetic drumheads, but it’s a little trickier than that–since animal skins are much less uniform, you may actually peel off the skin if you apply any kind of abrasive and water.
To counter this, some bongo players use an oil that you can use as a lotion such as Manteca De Corojo (Palm Oil) or Lanolin (oil from sheep skin) as an attempt to loosen up dirt and grime, and then wipe up the excess with a dry lint-free rag.
I actually did some testing of both of these methods and I shared these results in a video here:
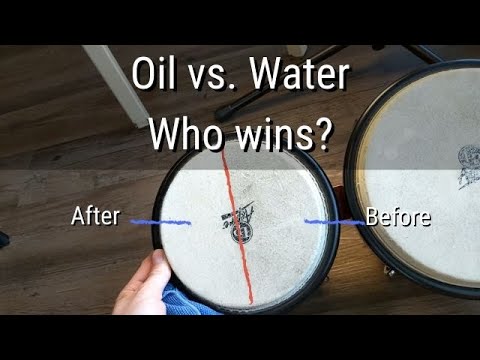
Ultimately, water was very effective but there are some concerns.
Cleaning Animal Skins With Water
Water and a rag for cleaning your bongo drums works really well–but even water might be too strong.
There are a couple issues here, just like our own skin, animal skin is porous, and so it soaks up water really well, so it’s very important to detune your drums so that as the drumheads expand and contract that they won’t be damaged.
Secondly, because water is by itself the universal solvent, when I tried to use it on my bongo drumheads, I noticed that using water on the drumhead (especially on the bearing edge), that the drumhead started to flake when combined with some light abrasion from a lint-free cloth.
So, in summary, be very careful when using water to clean your drumhead. It’s going to remove dirt very well, but you could damage your drumhead.
- Get a very lightly water-moistened lint-free cloth ready
- Rub the top of the drumhead (if you’re cleaning congas or bongos or other hand drums, avoid rubbing the bearing edge)
Cleaning Animal Skins With Oil
Using a skin-safe oil or lotion has its advantages and disadvantages:
Advantages:
- Safer for the drumhead than water
- If done right, can loosen dirt and grime making it easier to clean
Disadvantages:
- Oil can seep into the pores of the animal skin which can change the drumhead sound
- Oil may loosen dirt, but it can also attract it
The act of oiling animal skin drumheads is a controversial topic–one in which I go into much more detail here if you want to learn more about it.
Does Cleaning With Oil Work?
Cleaning your drumheads with oil is reported to work for some–and if you check out the video I link to above, I can confirm it does a little. It probably is more effective on dirtier drumheads since mine were not too bad–but I also know that water was much more effective in picking up the dirt on the drumhead.
However, a little bit of dirt on a hand drum doesn’t hurt–so cleaning with oil will most likely be good enough for your needs.