This post contains affiliate links. We earn commissions if you purchase products from retailers after clicking on a link from our site. As an Amazon Associate, we earn from qualifying purchases.
So, you got this awesome jaw harp and you want to play it! But you saw that terrible video of that gentleman busting his tooth on one. Is there a safe way to play the jaw harp?
The jaw harp can be safely played by placing the two parallel bars against the top and bottom teeth with a gap wide enough for the reed of the jaw harp to pass between. Also, the player should apply the correct pressure to avoid excessive vibration and should strike the reed towards themselves.
It’s not just as simple as picking the jaw harp and putting against your teeth and playing, I’ll go over how to play the jaw harp step by step with a safety first mentality because after all, teeth don’t grow back.
NOTE: The Jaw Harp is the same instrument as the jews harp, the mouth harp, the doromb, the trump, the vargan, and the khomus. These are all regional and design specific names.
How To Play the Jaw Harp
The jaw harp is an ancient instrument and beautiful instrument that’s worth learning. Let’s get into it!
By the way, looking for recording equipment and musical instruments? Check out Sweetwater.com for microphones, monitors, audio interface or any other recording gear that you could ever need. (Affiliate Link)
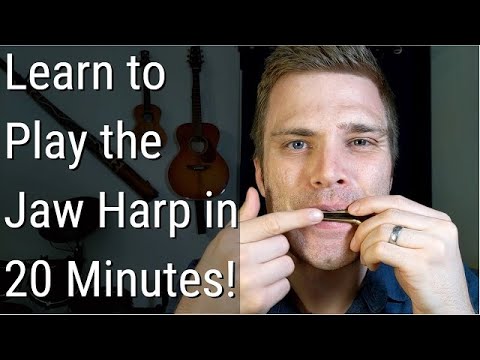
(If you’d rather learn by video, I have explained many of these concepts in my video here)
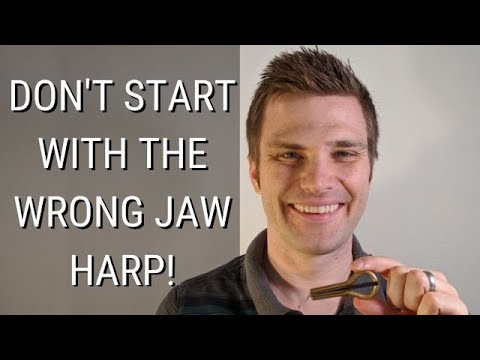
Step 0: Get a Jaw Harp That Isn’t Terrible (And Dangerous)
I guess it’s not fair to call any instrument terrible, but what I mean by this is that not all jaw harps are created equally. A good jaw harp is extremely inexpensive–But, it’s possible to spend too little money for one.
For $5, you are likely to get a jaw harp that is too stiff or too heavy. There’s a really popular jaw harp that you can find in novelty stores and occasionally in a music store–and it’s in the $5-10 range… and it’s a dangerous instrument.
Because they are inexpensive, the design of these instruments includes thicker metal, which lends itself to a lot of weight when you push the reed of the instrument. This reed can smack you in tooth and break something. Please, spend a few more dollars on a better instrument so you don’t hurt yourself.
Another problem with the super cheap jaw harps is that because they are not carefully made, they aren’t very loud. You’ll find yourself flicking the reed harder to try and get more sound. Since these jaw harps are stiff to begin with, you’re setting yourself up for a potential accident.
So, make sure to get the right jaw harp to start with for a few more dollars.
What is a few dollars? My current jaw harp I got for less than $20 including shipping and the difference in quality is outstanding. It’s lightweight, it sounds much better, it’s louder, and the reed is much thinner making it safer.
I talk about this in more detail in my YouTube video here:
I recommend the Pavel Potkin Vargan as the starting jaw harp. It’s very inexpensive, and it’s incredible quality. Check it out on Bebbcorp Harpery, here.
Step 1: Correctly Hold the Jaw Harp
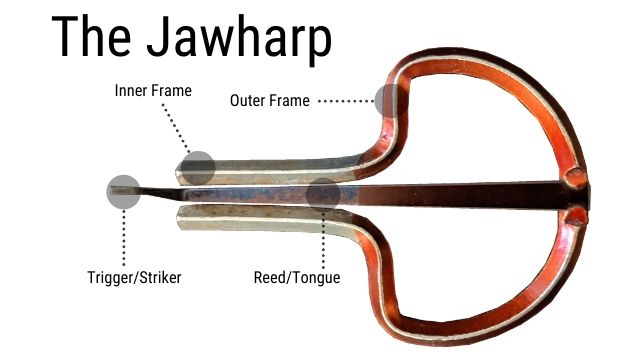
One of the coolest parts about the jaw harp is that each one of them are very different from one another. They come in dozens of different shapes, configurations and sizes, although they will all come back to the same premise of making sound via a reed vibrating between two parallel bars (the inner frame).
Because of this, each grip may be slightly different from harp to harp.
I’ll share a few pictures of some grips–but your harp will be a bit different. They key is to find a grip that can hold the harp securely against your teeth but does not collapse the parallel bars (which I’ll the inner frame).
Pinch Grip
If you’re new to the jaw harp, I recommend trying to use the pinch grip first as it is most likely to work for your harp and provides excellent stabilization.

For this size of harp, I find a pinch grip works well. The thumb and middle finger of the left hand can pinch the bottom of the wider end of the jaw harp (the end opposite the striker). The pointer finger is on the top for stabilization and should not be pressing down.

Here is the pinch grip again on a Glazyrin Lighthouse bass harp, which is a much larger harp. Notice that I’m pinching with my thumb and on the 1st knuckle of my middle finger because of the harp’s size. My pointer finger again is on the top of the jaw harp for stabilization.
Cradle Grip
I found that this grip works okay for my Grover jaw harp (as does the pinch grip).

The cradle grip can work okay, but you have to be careful to not squeeze the top and bottom of the jaw harp together, or else you’ll experience some “clinking”.
Alternate Pinch Grip

In this alternate pinch grip I’m using my thumb and my forefinger to grip the harp on the upper left side of the frame. This isn’t stable by itself and you have to use your teeth or lips as a counterpoint for this particular grip.
The alternate pinch grip also works okay even though it is not quite as stable as the pinch grip, but it has an additional advantage in that you can now use your free middle finger to mute the jaw harp by tapping the reed. You can move the middle finger along the reed at different points to change the pitch of the instrument as well for some really cool effects.
I don’t recommend this grip starting out as you’re learning. However, if you want to try advanced muting techniques, this one works well.
Tip for Good Sound Grips (say that 10 times quickly)
Whatever grip you choose, make sure to not squeeze the top of the jaw harp towards the bottom of the jaw harp. What this will do is cause the parallel bars (the inner frame) to collapse and *clink*, which, although the jaw harp makes many wonderful sounds, this isn’t the sound you’re looking for.
Step 2: Place the Jaw Harp Against Your Teeth
There’s some right ways and wrong ways to do this, so let’s go through carefully to make sure we don’t miss anything.
First off, don’t bite the jaw harp.
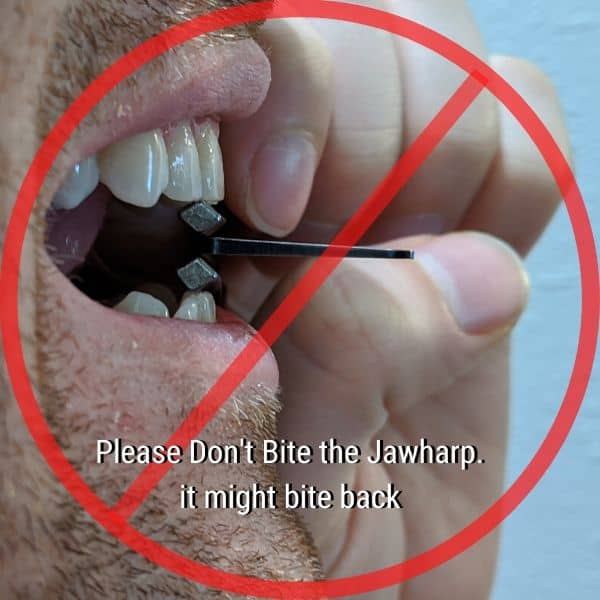
The correct way to do this is to firmly place the inner frame of the jaw harp against your top and bottom teeth. You can think of it as your skull is being used as a counterpoint for the jaw harp.
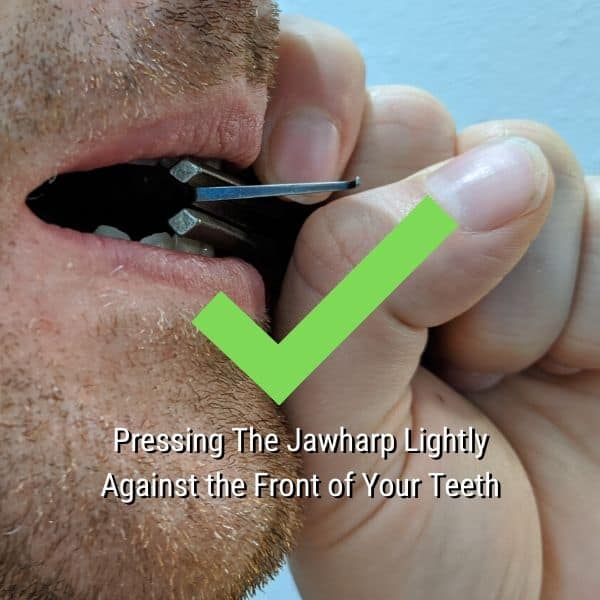
Now how firm (or light) do you need to press against your teeth? Firmly enough so that the jaw harp does not rattle when played. But lightly enough so that you are not causing strain on your jaw.
Place the jaw harp so around 50-75% of your mouth is covered by the jaw harp and let the right side of your mouth be open.

This picture illustrates around where the harp should be–it’s covering around 55% of my mouth right now, but usually I play with it around 60-70% of my mouth covered.
On this subject of placement, if you’re worried about hurting your teeth or your jaw, you are very smart! Because the jaw harp is a metal instrument that you are putting against your teeth and it’s very good to be very cautious. If you would like to know more technique pointers to avoid damaging your teeth check out my post, here.
Safety Tip
Make sure there’s a large enough gap between your teeth for the reed to pass safely. I’m exaggerating my mouth a bit in the above picture, but you do want a good amount of room so there isn’t a chance the reed can strike your teeth.
Step 3: Make a Seal With Your Lips
The next part is very important. The way the jaw harp makes sound is that your mouth is being used as a resonance chamber for the vibration of the reed between the parallel bars of the inner frame.
If your mouth is not making a good enough seal, you won’t play as loud because your mouth isn’t resonating as much as it could be.
Here’s an example of what the jaw harp will look like when my lips are sealing around the frame of the jaw harp.

As you can see my mouth is leaving only a quarter inch gap of open mouth on the right side of my mouth and my lips are pressing lightly on the top edge of the jaw harp. This is creating a loose seal so that I’m going to capture as much of the vibration of the reed as possible.
Now that you’re holding the jaw harp, you’re pressing it against your teeth and you have a seal on your lips, you’re ready to make sound!
Safety Tip
Make sure the reed has some room to go in between your lips
Step 4: Strike the Trigger
When I first played the jaw harp I did what anybody would do, I just pushed the trigger away from my face and waited for some results.
It turns out there is some finesse here. There are a lot of ways to strike the trigger, you can use your index finger (or any other, really), you can make the trigger movement with just your wrist or you can move your whole arm. If you have arthritis of any kind you may find that moving your whole arm might be more comfortable.
You can also play with the side of your index finger with your elbow at the level of your head and your wrist dangling loosely. This method works great for an advanced technique called double striking.
For now, just pluck the trigger with your index finger.
Tips for Success and Safe Playing

- Push the trigger towards your face: This sounds counter-intuitive, but the reason for this is the reed is essentially storing up potential energy when you pull it back (think of drawing the string of a bow), and if you strike the trigger away from you, that potential energy is being released towards your mouth! Do yourself a favor, and strike the trigger towards your mouth.
- Focus on pushing the trigger exactly between the two bars of the inner frame: If you pluck the trigger at an angle, the reed will strike the bars of the jaw harp and make that *clink* once again. This takes some practice so don’t worry if this takes a while to get the hang of.
I talk more about techniques you can do to not hurt yourself playing the jaw harp in my video, here:
How about that! You made some sound. Let’s do more.
Step 5: Use Your Tongue To Shape the Sound
Awesome!!!! By this point, you should be making some sound!
…
Now what?
Well, my friend, your horizons just grew infinitely. The jaw harp is an amazing instrument and you can do a lot!
The first and easiest technique is to move your tongue around and change the shape of your mouth.
As I said, the mouth is being used as a resonance chamber to make the sound. If you change the shape of your mouth you can change the harmonics and overall sound of the instrument.
Try getting your mouth into the position to say the the vowel AH. Pluck the instrument a few times to get a feel for that sound.
Next, while still plucking the instrument, change the shape of your mouth to say the vowel EE.
Move back and forth between all the vowel sounds to explore the different sounds of the jaw harp.
There could be a book written on all the sounds you can make with the jaw harp but you’ve now made a tremendous start. Well done!
Step 6: Breathe Through the Jaw Harp
Now we’re almost there to learning how to make the basic sounds of the jaw harp.
Next up is to breathe through the jaw harp while playing.
It really is as simple as that. The key to success on this one is to make sure you have a good seal on your lips so the air goes in between the reed and the inner frame.
Practice breathing out while plucking the jaw harp.
Next try breathing in while plucking the jaw harp.
Both of these motions sound a bit different, but both can be used together to make awesome rhythms.
An easy rhythm you can do is to pluck the jaw harp on beats 1, 2, 3, 4. (just count to 4 rhythmically and you’ve got it), and then to breath in on beats 1 and 3, and to breath out forcefully on beats 2 and 4.
You can build off of that and make your own rhythms and just have fun… one of my favorite parts of the jaw harp is that it’s made just for this–having fun and exploring its sound.
Next Level Breathing
You can take this technique to the next level if you use sharp breaths (in or out) using your diaphragm. It’s a way to give a punch to a particular note.
Bonus Step 7: Learn Advanced Techniques
You’ve made it! You’ve learned all the basic sounds of the jaw harp. If you want to keep going you can learn advanced techniques that give a huge variety to the sound of the jaw harp.
I’ve made two videos explaining advanced techniques on the jaw harp, one is on some generic advanced techniques in normal playing.
The other video is on how you can use the jaw harp for techno music and I talk about some techniques specific to that style, check it out here:

A couple techniques I will mention here if you don’t get a chance to watch the videos:
- Rolling the tongue: It’s a simple technique, but it can be used effectively to build tension. A really cool combination is to use a sharp breath exhalation at the end of a tongue roll–so it is kind of like a snare drum roll ending in a rimshot.
- Manipulating the glottis: The back of the throat can be manipulated with swallowing motions and that can actually adjust your sound. You can actually make melodies out of the harmonics of the jaw harp with a combination of manipulating your glottis region and the shape of your mouth with your tongue.
- Double striking: Once you have good striking technique, you can use your index finger and a loose wrist to strike the jaw harp backwards and forwards quickly for faster playing.
Extra Bonus: Troubleshooting
If you’ve made it here, you might be wondering what to do if you are running into issues. let’s try and figure it out.
Jaw Harp Is Clinking
There are a few things that could be causing this so let’s go through them:
- The first thing to check is if your grip is squeezing the top and bottom of the jaw harp together. Try using the pinch grip so the pressure is in the pinch and not in squeezing the instrument
- Next make sure when you pluck the instrument you aren’t plucking the striker at an angle. You need to pluck the reed straight back.
- If your jaw harp has never worked properly, it’s possible that the inner frame is bent too far towards the reed. Take a close look at the reed and make sure the reed has clearance to pass between the bars of the inner frame.

If the bars of the inner frame are overlapping the reed or there is no clearance between the two, you can try to (very gently) push the bars apart. You can ruin your instrument this way and I can’t take responsibility for that–but it is something you can try if your harp is unplayable.
No Sound Is Coming Out
Again, there are a few things that could be causing this issue, so let’s go over them.
- Make sure your grip is not touching the reed: The reed is the bendy part of the jaw harp that moves when you pluck the striker. If your finger is touching the reed, the reed won’t vibrate and you won’t make a (meaningful) sound
- Make sure you have a good enough seal with your lips on the instrument: If your lips are too far from the frame or not making a good seal, the sound won’t project near as well.
- Make sure the jaw harp is positioned correctly on your mouth: Aim for around 50-75% of your mouth being covered by the jaw harp
Make Your Jaw Harp Louder
If your jaw harp is not making significant sound, it might not be your fault. If you followed the steps in the previous section, I talk about making sure your lips are making a good enough seal. If you have already done that and it’s still not working, let’s look at the instrument again.
If the gaps between the reed and the inner frame are too large, the sound will not be as full or resonant.
This is very common for the cheapest jaw harps. The clearance is higher and thus when you play it’s harder to get a good volume.
You can (if you accept the fact you might damage your harp) try and bend the inner frame closer together very gently so you can close that gap. Again… I can’t be held responsible for a damaged jaw harp. For this reason, I only really do this for my Grover harp since I don’t care as much about it.
Extra Extra Bonus! What Next?
You are awesome, you made it all the way here. I will reward you with a fantastic resource that helped me a ton in learning the jaw harp.
Jonny Cope teaches how to play the jaw harp on Udemy, here. He also teaches an advanced class there and I have studied both of them and they are great resources.
Jonny goes over many of the basics I’ve talked about here but in much greater detail and will walk you through each step so by the end you’ll feel much more confident. He also covers many advanced techniques and topics that are worth your time. Highly recommended.