This post contains affiliate links. We earn commissions if you purchase products from retailers after clicking on a link from our site. As an Amazon Associate, we earn from qualifying purchases.
Bongos are a super fun instrument that you can start jamming with in a few minutes! Like any instrument, there’s a lot to know, and it can be overwhelming figuring out where to start. This guide and tutorial is all about how to get started playing the bongos.
By the way, looking for recording equipment and musical instruments? Check out Sweetwater.com for microphones, monitors, audio interface or any other recording gear that you could ever need. (Affiliate Link)
To get started playing the bongos, a fundamental knowledge of the following is required:
- Bongo anatomy and terminology
- Bongo tuning
- How to hold the bongos
- Which parts of the hand to strike the bongos with
- Bongo Techniques
- Bongo notation and sheet music
- Some basic rhythms to play
- Playing style and genres
- Where to go next
That may sound like a lot, and I suppose it is, but I’m going to break down each component and add the important details so you can have everything you need to start playing the bongos in one place.
If you learn more by video, I did make a video that covers many of these basics, but I will be going into more detail here in this bongo tutorial.
Bongo Anatomy and Terminology
When you start learning to drive a car, you need to know what everything is called. If you don’t know what a gear shift is or what yield means then when you’re on the road you’ll find yourself in trouble!
Similarly, it’s important to know the anatomy of the bongo drums and what things are called so when you are learning you know what to do when someone says to “strike the bearing edge” for instance.
Bongo Anatomy
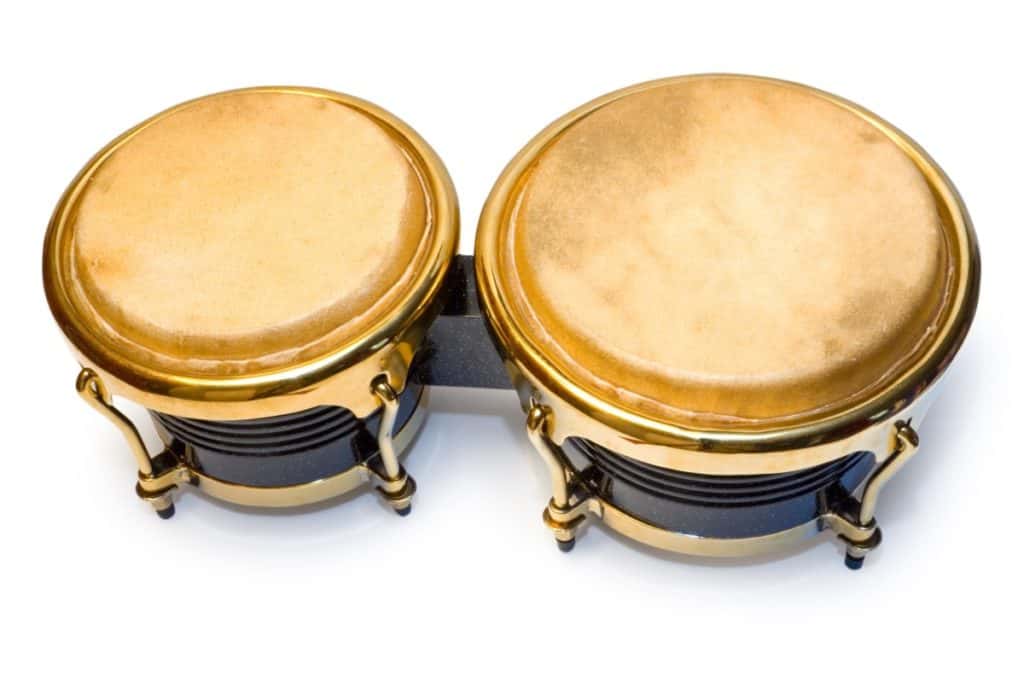
First things first: The larger bongo drum is called the hembra, while the smaller bongo drum is called the macho. The bongos are held so that the macho is on the left (somewhat counter-intuitive at first).
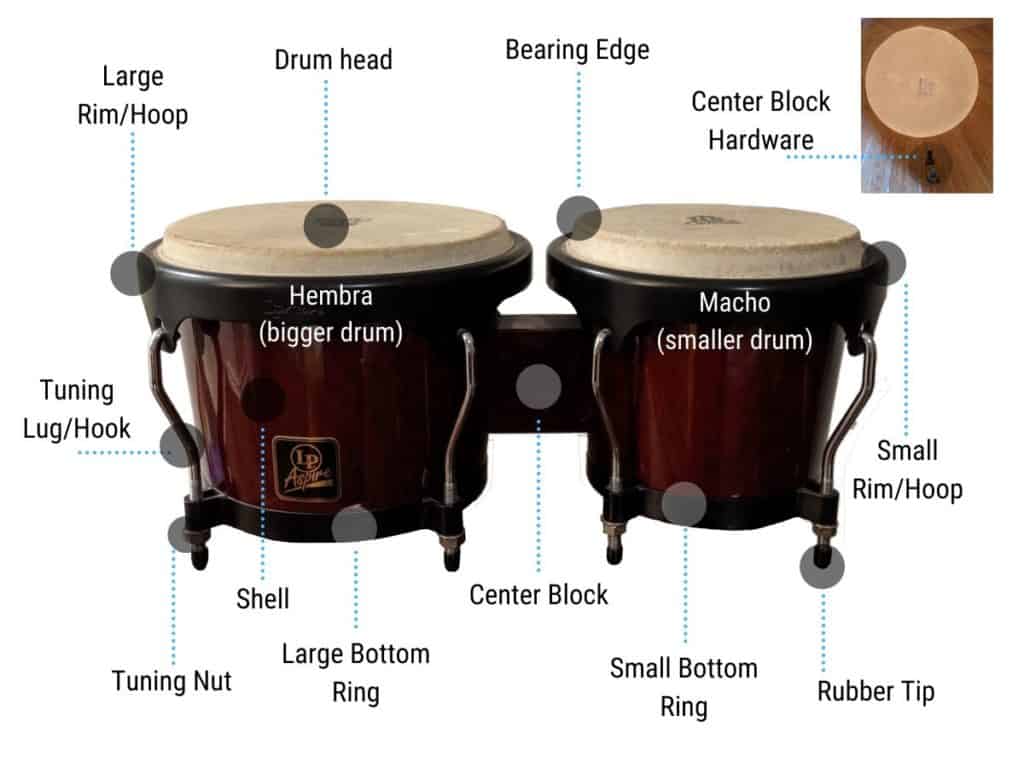
Here’s a diagram with all the different parts of the bongo–I’ll break it down to help in this discussion.
In order of most important to know and understand to least important:
- Drumhead: The drumhead is a membrane either made from animal skin or from synthetic materials that is stretched tightly over the bearing edge. The drumhead is where you strike the drum and create sound. The drumhead vibrates from being struck and can even cause the shell to resonate, creating tone. The drumhead is tucked between the bearing edge and a metal hoop to give the drumhead that uniform circular shape.
- Bearing Edge: If you imagine the bongo drums without drumheads for a second, you’ll see that bongo drums are basically just wooden cylinders (often slightly conical). The top of these cylinders where the drumhead is stretched over is called the bearing edge because they bear the pressure of the tightly stretched skin. The drumhead is stretched over the bearing edge with the help of the rim.
- Rim: The rim of the bongo drums are what pull the drumhead over the bearing edge, which creates the drum. The rim is an inch or below the level of the bearing edge. The rim is pulled towards the bottom of the drum by help of the bottom ring, and by the tuning lugs. The tuning lugs are tensioned with tuning nuts which essentially pull the rim towards the bottom of the drum.
- Tuning Lugs and Tuning Nuts: The tuning lugs are essentially hooks that attach to the rim. These tuning lugs pull the rim towards the bottom of the drum and are tightened by tuning nuts.
- Shell: The shell of the drum is the actual wooden cylinders that the drum hardware and drumhead is attached to. The two wooden cylinders are connected by a center block. The shell can resonate with the force of striking so shell construction can impact the sound. The most common construction method for beginner to intermediate bongo drums is by using staves–rectangular blocks of wood that are glued tightly together. Bongo shells can be carved from a large block of wood, but typically that is only the custom-made or premium bongos.
- Center block: The center block’s purpose is to join the two wooden cylinders of the shell. The center block is joined to the shell in less expensive bongos by hardware that is screwed through the shell. In custom-made bongos or in specialty bongos such as the Meinl free-ride suspension system, the center block is either embedded into the shell or use another connection method that doesn’t require drilling into the shell (to assist in resonance)
- Bottom Ring: The bottom ring of the bongo serves as a connection point between the tuning lugs, tuning nuts, and the the rim. As you tighten the tuning nuts, the tuning lugs pull the rim more tightly towards the bottom ring.
Now that you know all the terminology of the bongo drums, it’s time to learn about proper tuning.
Bongo Tuning
Perhaps if you’re new to percussion you might be surprised to know that tuning is even a thing. If you play flute, the saxophone, or the trumpet, you definitely would expect tuning as these are melodic instruments. While bongos are not melodic instruments per se, they, like any percussion instrument, have tone.
I’ll preamble this discussion by saying that bongo tuning is not nearly as important as learning the basics of the instrument. That being said, it’s important to get a tone that you like and which fits into the music you are playing.
What to Tune the Bongos To:
Although the ultimate tone that you prefer is completely subjective to your own tastes, within the bongosero community, often the macho drum is tuned very tightly, with the hembra several tones lower.
As an example of how bongos are often tuned, listen to this teacher in Chile:
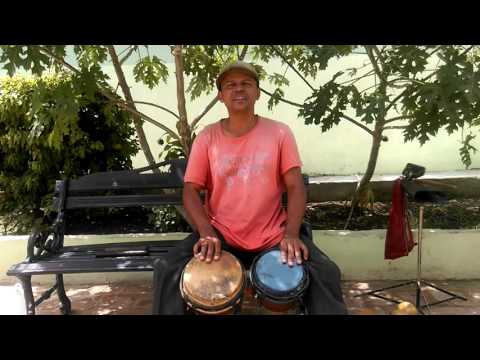
It’s hard to assign a note value from listening, but from what I can hear the macho was tuned to around an A5 while the hembra was tuned closer to a D.
Don’t worry about tuning to a specific note, but rather, find examples that you like to listen to and try and emulate the tones you like.
How to Tune the Bongos
I go over this in my video at the start of this lesson, but I’ll also go over the steps as a quick reference.
- Find a pitch of drum that you want to emulate. Everybody’s bongo drums sound different so understand you might not get the exact same sound, but you can get in the same ballpark of pitch at least. If you don’t know your destination, it’s hard to know when you’ve arrived.
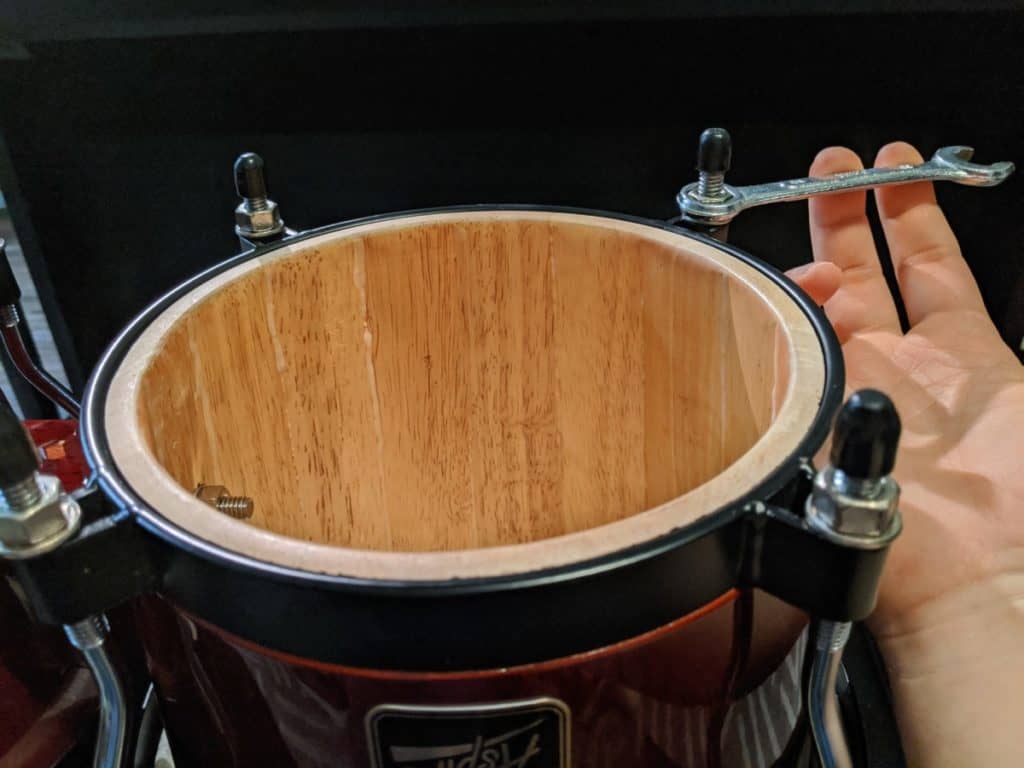
- Flip the drums over and use a tuning wrench (often included with the bongos) on the macho drum’s tuning nuts going clockwise. If you’re just learning how to tune, start with a quarter turn at a time.
- Flip the drums over right side up and test the tone of the macho by striking the bearing edge of the drum and quickly releasing to hear as much tone as possible. You can make sure you have an even tone by striking the drums right above where the tuning lugs are. If they are uneven in pitch then either the tension is uneven or the drumhead itself is uneven (which isn’t uncommon).
- Repeat this process until the macho is tuned
- Repeat steps 1-4 for the hembra
- When you’re finished playing, slightly detune the bongos by loosening the drumheads a half turn so they aren’t resting at such a high tension.
How to Hold the Bongos
The most natural thing to do when asked how you would hold the bongos is simply to place the bongos on your lap. While you’ll definitely be able to hear yourself play, the bongos will lose some of their resonant qualities and will sound more muffled. There are two methods for playing the bongos that will allow the sound to be more open.
The Bongosero Stance
The bongos are placed with the macho (the smaller drum) on the left.
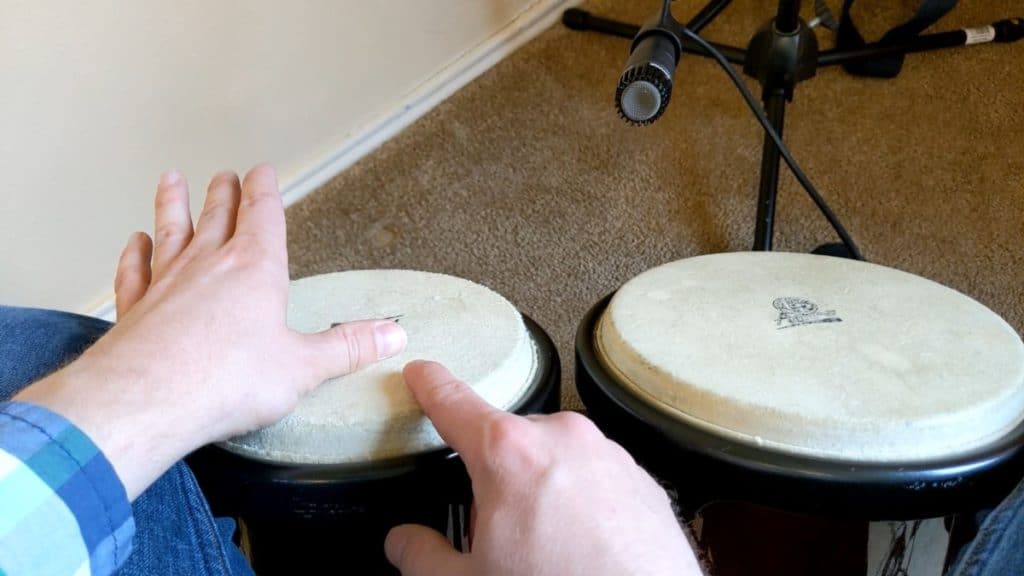
The traditional way to play to bongos is with your knees cradling the bongo drums directly underneath the rim on opposite sides of the bongo drums. See this picture for a demonstration of what I mean:
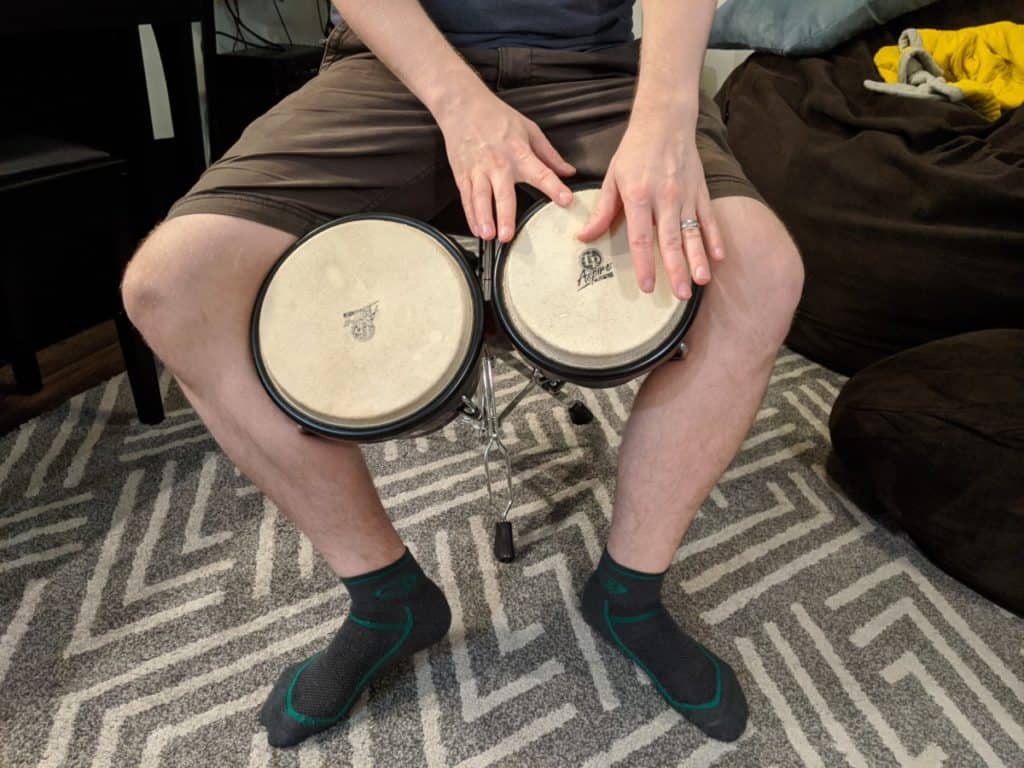
The bongos should be held at an angle that is parallel to your forearms at the end of a stroke. You can’t really hold them parallel to the floor, so no need to try.
Your feet should be pointed perpendicular to one another to give stability.
This may feel awkward at first, but this allows the bottom of the bongos to be open as you are playing, allowing them to resonate and have a fuller sound.
It’s also important to try and keep a straight back. You can hinge from the hips slightly as long as your lower back is straight. If you feel uncomfortable, check the height of your seat and make sure you aren’t hunched over.
Bongo Stands
Another popular option for holding the bongos is actually to use a bongo stand. Bongo stands are built in such a way so as to suspend the bongos so they can be positioned at your height (whether sitting or standing) as to allow the bottom of the bongos to be open. Musician’s Friend sells one by LP here if you want to see what they look like.
Bongo stands are pretty cool, and a must if you want to play bongos and anything else other than bongos during a song. Bongo stands give you the flexibility of playing the bongos for a moment and then moving on to another instrument.
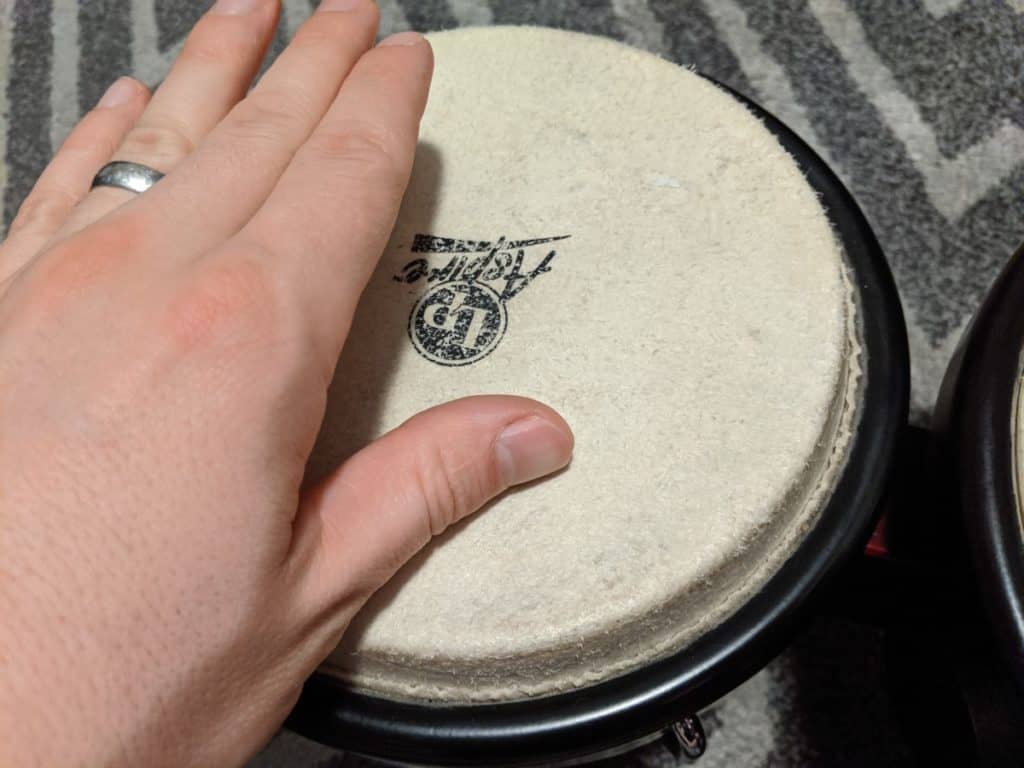
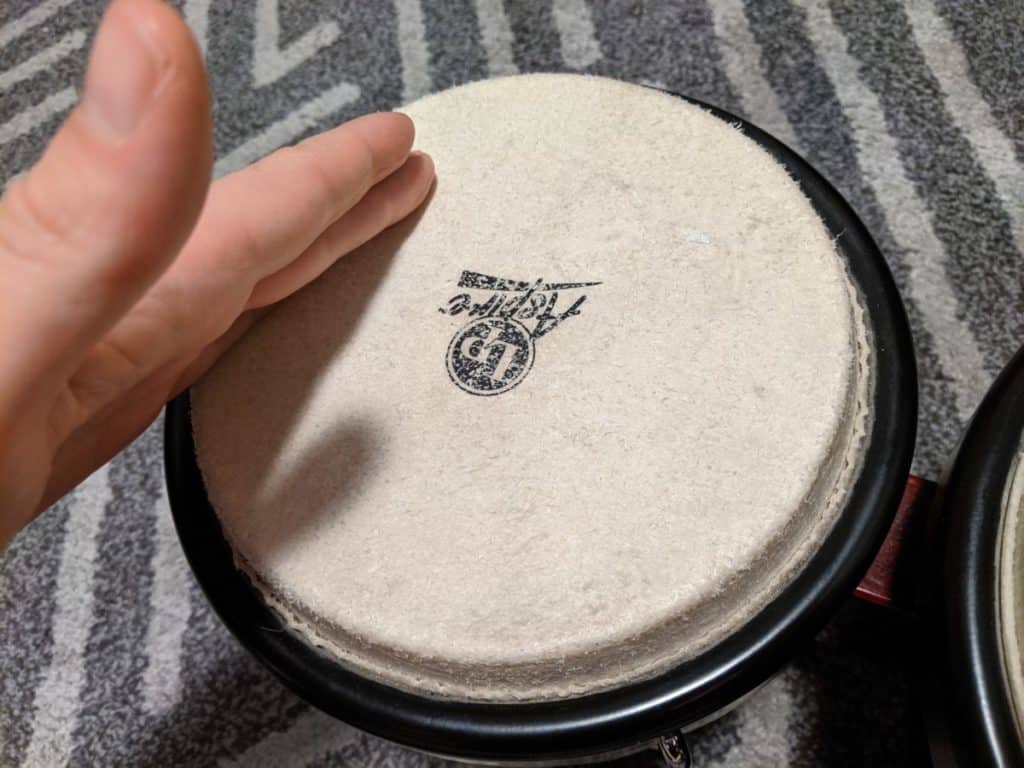
Which Parts of the Hand to Strike the Bongos With
Now that we know the anatomy of the bongos and how to hold them, the next question is what part of hand should be used to strike the bongos?
Although nothing is really stopping you from slamming your hands donkey-kong-style with your entire hand on the bongos, that’s not really the most ideal way to play.
You should aim to use the last half to 1/3rd of your fingers to play the bongo drums. Furthermore, the best spot to play is with the pads of your fingers.
This can be difficult to remember to do, but it’s very important to sustain the health of your hands.
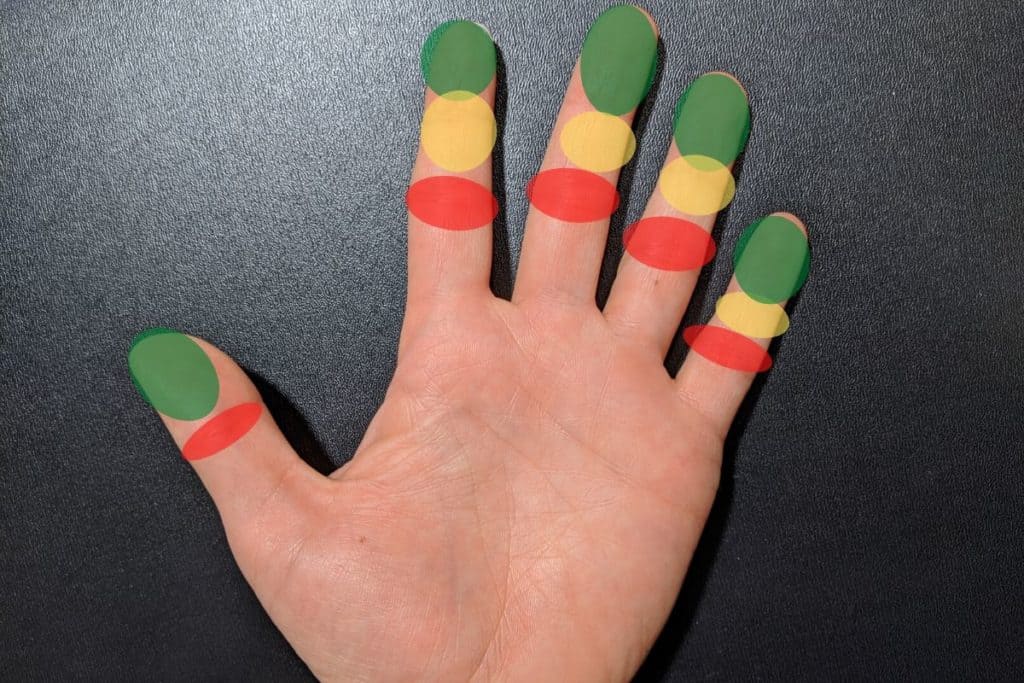
If you strike the bongo drums with the joints of your fingers you can damage the nerves in your hand. If your hands are throbbing with a dull pain after playing then this is a signal that you should look carefully at your hand technique and make sure you are not striking the drums with your joints.
That being said, there is probably going to be some discomfort when playing for the first few days as you practice–just be mindful of your technique and try not to play at full volume so your hands get used to playing a hand drum.
Bongo Notation
As you’re learning the bongos, you can either listen to music and play rhythms by ear, or you can learn to read bongo notation.
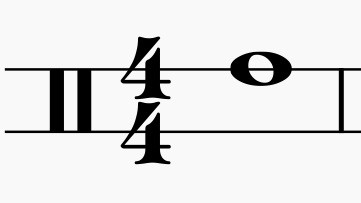
Bongo notation follows standard percussion notation. I’ll give you a basic rhythm and give you an audio file so you can listen to what it sounds like.
In this simplified bongo notation, there are two lines. The higher line represents the macho (the smaller drum on your left), and the lower line represents the hembra (the larger drum on your right).
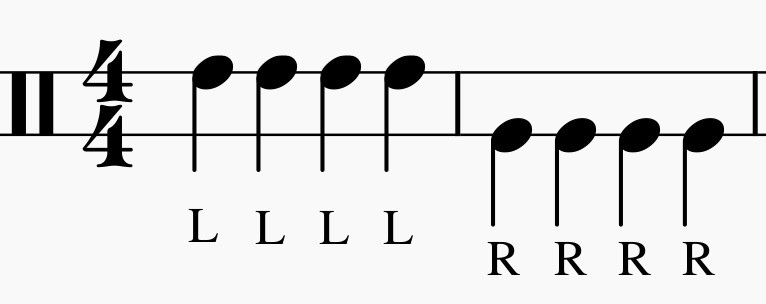
This simple rhythm is just hitting the macho 4 times, and then hitting the hembra 4 times, and is split into two measures.
Never read music before? Don’t worry! It’s not as bad as it looks, and there are things about bongo notation that are much simpler than if you were learning the piano. Read this section which is later on in the post if you’d like to know how to better interpret the sheet music above.
Bongo Techniques
When I first got my pair of bongos, I really had no idea about any kind of bongo techniques… and sad to say, I remained in this state for over a decade. I never took the time to learn traditional bongo techniques. I missed out because the bongos have some huge variety in sound which make them so dynamic and COOL, and so it really helps to understand the basic bongo techniques.
This could fill several pages of information, but I’ll briefly go over some of the basics here. You can check out my YouTube video on bongo techniques if you want to see and hear all of the different techniques in action:
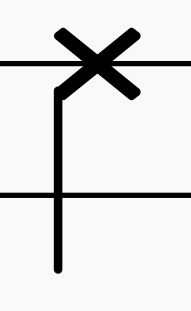
I’m going to explain the different techniques with an example notation. These are not definitive since many, many different types of notation are out there–usually the person writing the sheet music will include a legend explaining which notation matches with each sound.
If you want to learn more about bongo notation and some different examples, check out our post here all about it.
Open Tone
The open tone is the simplest and most straightforward way to strike the bongo drums. Gently hit the drum near, but not directly on the bearing edge–more towards the center of the drum.

One very important aspect of the open tone is that you immediately raise your hand after hitting the drum. You don’t snap it back, but it’s more similar to the physics of your hand bouncing off of the drum, gently pulling back after hitting. This is what gives the drum an open tone, and you’ll hear your drum resonate slightly.
Muted Strike
The muted strike is done by pressing the thumb into near the center of the drum and then striking near the bearing edge (not directly on the bearing edge) with the opposite hand’s index finger.

The Heel
The Heel and Toe make up the Manoteo, which is simply your (mostly left) hand rocking back and forth between the heel and the toe. The heel in the Manoteo sets up the muted strike.

The Toe
The toe is the other half of the Manoteo. I’m exaggerating how far you’d rock your hand so you can see what’s in contact with the drum. It’s simply the last two or three fingers of your hand. The Manoteo would then repeat with the hand coming back into the heel position.
Now that you have the some bongo techniques under your belt, it’s time to incorporate these into different rhythms.
Some Basic Rhythms to Play
Let’s start back with the basic rhythm we learned before:
Quarter Notes
Although this is a simple rhythm, you will be light years ahead of other beginners if you can nail playing this rhythm steadily without variation of time between the notes. Evenness in your rhythms is critical to successful bongo playing.
Eighth Notes
Now, we’ll throw in some eighth notes to make the rhythm more interesting.
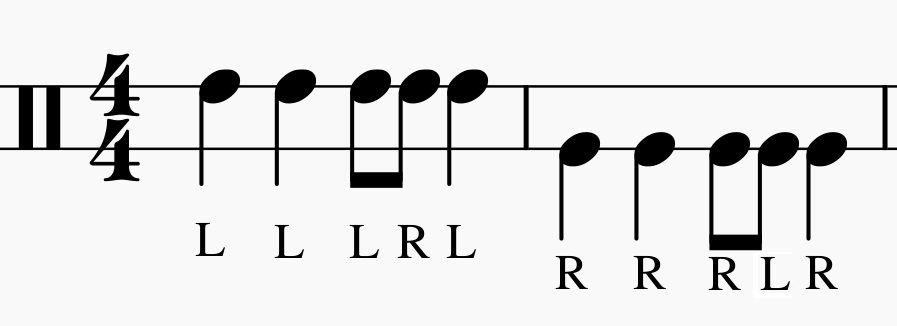
This is a fairly basic rhythm but would actually do really well in keeping time in a song. The best part about bongos is that you can embellish and make this rhythm interesting as is tasteful for the style of music you are playing.
The eighth notes (if you’re new to sheet music) are half the value of the quarter note. Listen to the rhythm a few times and you’ll see that the eighth notes fall exactly between the length of a quarter note.
The Martillo Rhythm
Next I’m going to show you a fundamental rhythm to many types of Latin music that can be used in many different genres: the Martillo.
The Martillo rhythm is basically synonymous with the bongos. Every bongo player learns the Martillo rhythm as a matter of course. Does that mean that Latin music only plays the Martillo in every song?
Well, no, but it serves as the foundation, and in fact many bongoseros will play complex rhythms and then come back to the Martillo, because the rhythm serves as an anchor for the song.
The Martillo is more complicated than what we’ve learned previously. I recommend watching my video on the Martillo if you want to accelerate your learning.
This is the sheet music for the martillo according to the notation we’ve already talked about:
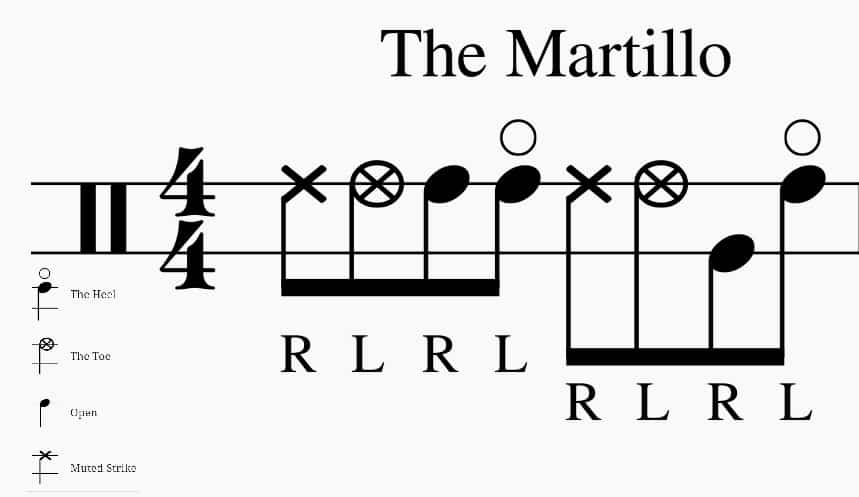
The Martillo is one bar in this notation (can be 2 bars in 2/2 time signature… but it doesn’t matter to how it sounds), and it starts out with a muted strike–this means that you need to have your thumb pressing into the drum (the heel position) before you start the rhythm.
I’ll list out all 8 notes in the Martillo so you can see exactly how to play it.
- Muted Strike (macho)
- Toe (on macho with left hand)
- Open tone (on macho with right hand)
- Heel (on macho with left hand): This sets up the muted strike
- Muted Strike (macho)
- Toe (on macho with left hand)
- Open tone (on hembra with right hand)
- Heel (on macho with left hand): This sets up the muted strike
Once you have the Martillo down, your number of options explodes… you have so many places you can go from there! In fact I made a list of 40 rhythms of multiple music genres with their sheet music on this post here–many of those rhythms are simply variations of the Martillo.
Bongo Playing Styles and Genres
The bongos fit in a huge number of genres and music styles, although its home is in many different Latin music genres–Bachata, Salsa, Mambo, Bossa Nova and several older styles. It also is a favorite in many jazz genres as well.
Although bongos are not in every band, it’s also heard frequently in rock songs, and has some popularity in alt-rock specifically due to its more chill sound than a full drum set.
The way you play will change from genre to genre. Many, many of the Latin styles fit better with rhythms and bongo techniques of the Martillo, while rock songs prefer rhythms that accent 2 and 4 and are almost all open tones (rock music is often loud and not so subtle).
Don’t think you can’t use any number of bongo techniques in any genre, though–it’s up to your own interpretation, but I wanted to pass along how bongos often fit in other styles of music.
Where to Go Next
So, now that you’re learning the basics and you’ve even picked up a couple rhythms, now you may be asking yourself where to go from here.
If you want to learn quickly, I recommend finding a teacher–they will best help you with technique and help you focus on what’s most important.
The next best option is to follow a book: YouTube can lead to some confusion if it’s your only source of information since it’s really rare for an entire course of study to be on YouTube. I really enjoyed Trevor Salloum’s “The Bongo Book” and his other book “The School of Bongo”. The books walk you through the techniques (which you’ll have a leg up on since you’ve read this post!) and then they go through many different rhythms from different music genres (particularly the School of Bongo).
Next, I recommend you listen to the genre you want to play in and with and try early to play along–it will help you get a feel for the music.
Lastly, if you are interested in learning for Latin music styles, it’s very necessary to learn about the clave. The clave is another subject entirely that could fill books. It is essentially a rhythm that is the basis for many Latin music styles (and now is fundamental to many pop music styles as well).
Lightning Quick Sheet Music Primer
So earlier, we used this as an example for bongo notation. Let’s break this down so we make sure we understand what’s going on here:
In this notation, it starts with double bars–this is typically where a clef would go–the double bars mean that this is percussion notation, and that each line represents a different drum rather than a different note on a scale.
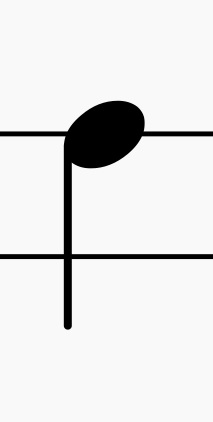
Each of the notes in this rhythm above is a filled in circle with a line up or down–this is called a quarter note.
This simple rhythm is broken up into two measures. A measure is the smallest unit of a song, and it’s just a way to subdivide the rhythm of the entire song. Measures are also called bars and that’s where the phrase “hum a few bars” comes from.
The 4/4 is the most complicated part of this whole notation–thankfully, most music you will be learning at first is 4/4, so if you learn 4/4 (followed by 3/4 and 6/8 and a couple others), you’ll learn the rhythm used for well over 90% of music today you listen to, today.
Feelin’ the Beat
To understand what 4/4 means, we need to understand what the beat is. If you listen to rock songs you’ll notice that there’s a natural feel to the song that you may find yourself tapping your foot to. This feel is the beat. In most music today, if you listen carefully, you’ll notice that the beat comes in groups of 4’s–this is true for any song in 4/4.
I’ll give a quick example of the beat of an oldie but popular rock song:
| 1 | 2 | 3 | 4 |
| I’ve BEEN | THROUGH | the DESERT | ON a |
The bolded text is the beat.
| 1 | 2 | 3 | 4 |
| HORSE with | NO name | … | … |
Just search on YouTube for these lyrics and you’ll find this song no problem.
This small snippet from “Horse With No Name” is made up of two measures.
Just listening to the song you’ll find your foot tapping (and I have to get your forgiveness if this song keeps you up at night relentlessly).
Now that we know what a beat is, let’s try and understand 4/4.
What Does 4/4 Mean?
This could be a big discussion, but I’ll keep it brief and only what you need to know. 4/4 is called a time signature and 4/4 essentially means that each measure (the smallest unit of a song) is 4 counts, and that a quarter note gets one count.
In a 4/4 song (different time signatures means the notes have different counts, this is how different note divisions look:
Notes
Whole Note: 4 Counts

Half Note: 2 Counts

Quarter Note: 1 Count

Eighth Note: Half a count
Rests
The following notation are called rests. A rest is simply a place where you don’t play.

Whole Rest: 4 counts

Half Rest: 2 counts

Quarter Rest: 1 count

Eighth Rest: Half a Count