This post contains affiliate links. We earn commissions if you purchase products from retailers after clicking on a link from our site. As an Amazon Associate, we earn from qualifying purchases.
The tin whistle is an amazing and expressive instrument, but it requires some knowledge and technique to really take advantage of its capabilities.
The following are crucial tin whistle techniques:
- Posture
- Tonguing (for English/American style playing)
- Vibrato
- Glissando
- Half covering holes
- Ornamentation (a class of techniques on its own)
Most of these techniques are not unique to the tin whistle, or even unique to fipple flutes (such as the recorder). If you read on and learn the techniques I’ll share with you, these concepts can carry on to many other instruments.
Posture: One Small Change You Need Now
So, there’s playing technique and then there are other techniques that may not affect the sound but will affect how easy it is to play and can even affect your health.
Believe me, it’s worth it to learn this one thing about posture and specifically the playing position.
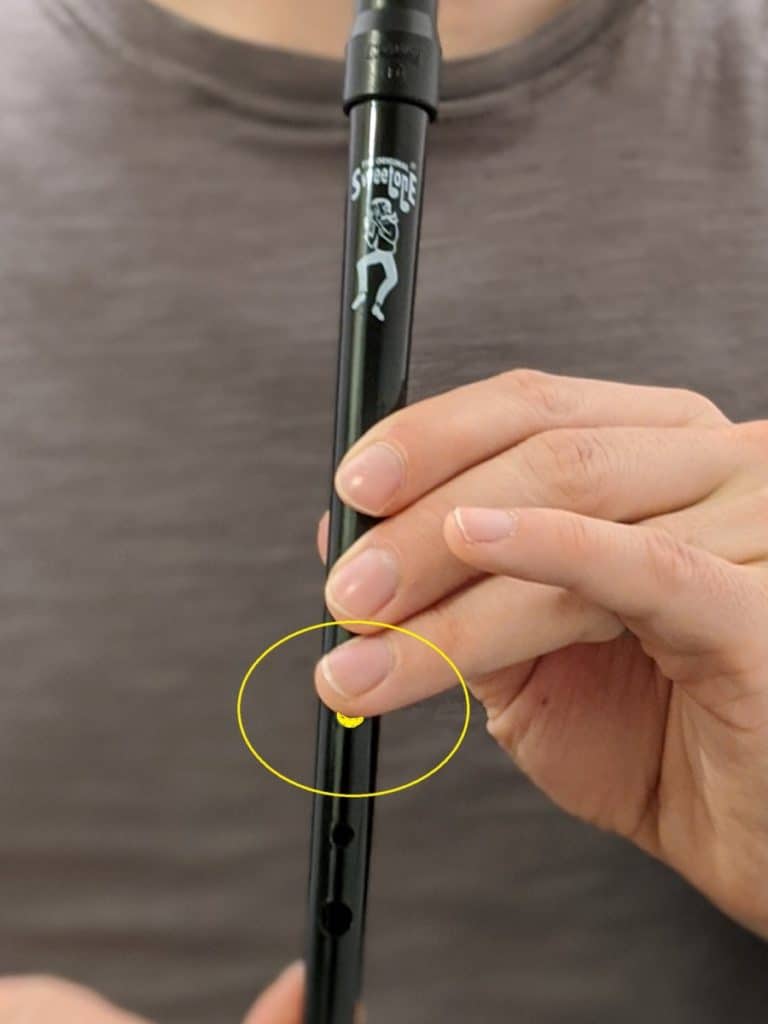
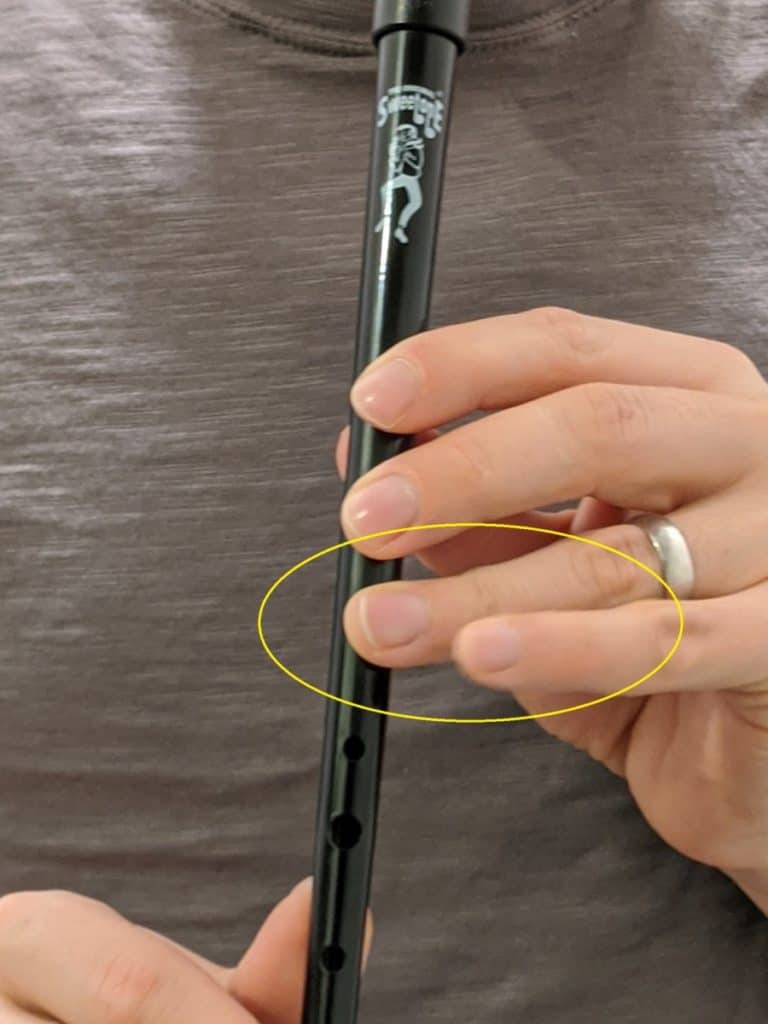
The Tin Whistle Helper Finger
When I got my tin whistle several years ago, I neglected to learn the basics and just started playing, which is unfortunate since I picked up some bad habits. If I could go back, I would have started learning while using the tin whistle helper finger.
How To Use the Helper Finger
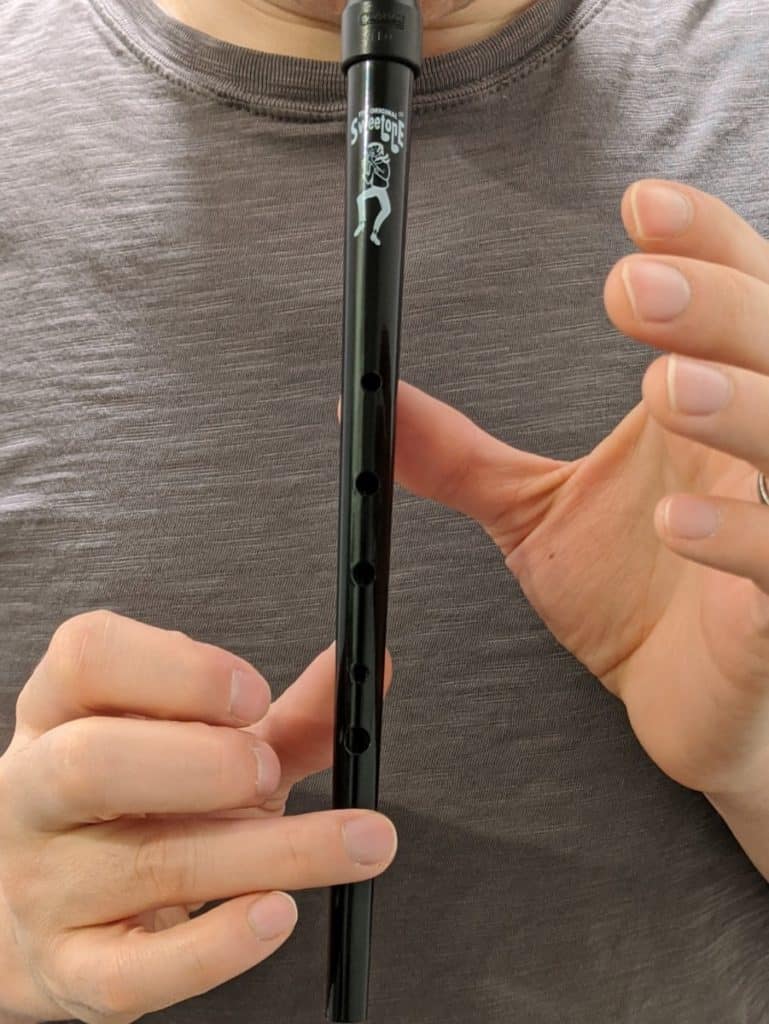
The tin whistle has 6 holes, and several notes are played with 2, 1, and even 0 fingers covering the holes. C# position is open!

By the way, looking for recording equipment and musical instruments? Check out Sweetwater.com for microphones, monitors, audio interface or any other recording gear that you could ever need. (Affiliate Link)
Now, if you try to play those notes, you may feel like you’re going to drop the whistle since it’s precariously balanced on your thumbs!
The helper finger to the rescue!
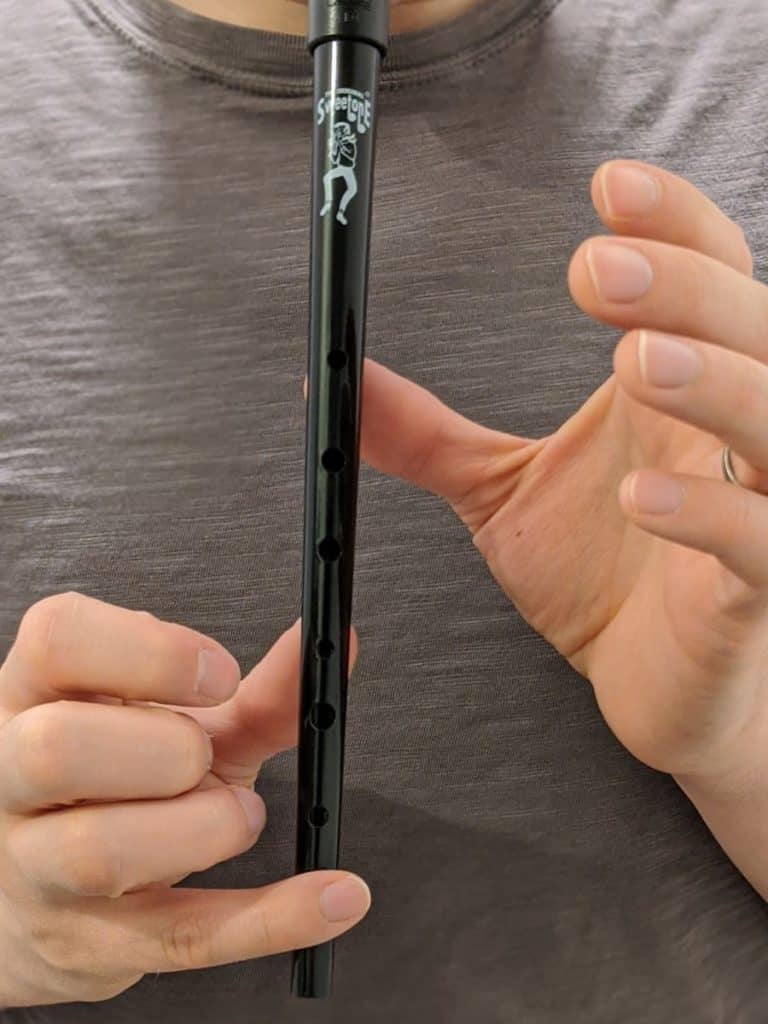
The helper finger can either be the right ring finger or the right pinky finger. The right ring finger can cover the 6th hole for notes A and above until D. Such as you can see in this example:
This picture is a little exaggerated so you can see… it’s good practice to keep your fingers close to the holes even when they are not covering the holes.
Alternatively, the right pinky finger can hold onto the bottom of the whistle.
I find the ring finger more comfortable than the pinky, but I hear those with longer fingers have more success with this grip.
The purpose of the helper finger is to give stability to the tin whistle while playing when you only have a couple of fingers playing notes.
Another huge benefit is to keep your fingers close to the holes, acting like an anchor. I can attest that during the beginning of my learning the tin whistle, I had a bad habit of letting my fingers get too far from the whistle. Using a helper finger helps your transitions because your hands are where they need to be.
Finger Arrangement
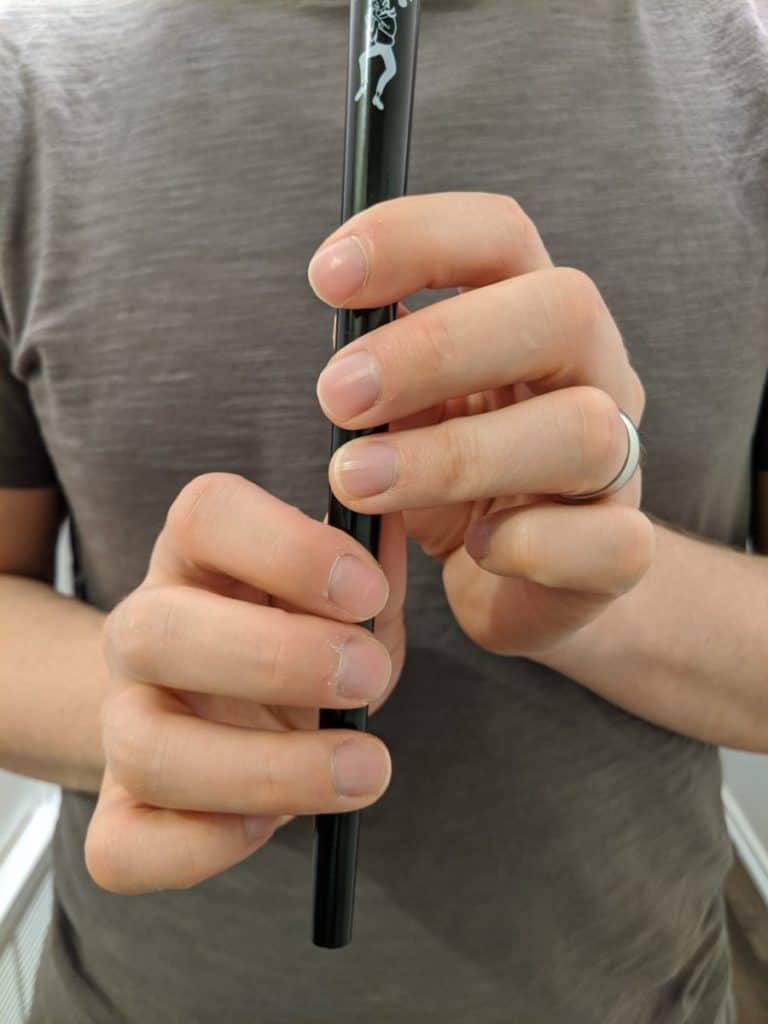
If you are playing the common D tin whistle or any other that are in the higher keys, then this is the shape of your fingers.
Rather than curling your fingers as you would if you were playing piano, your fingers should lie straight using the pads of your fingers to cover the holes. Just try and forget your piano teacher telling you to curve your finger and imagine a bubble under your palm and all that.
An exaggerated example of curving your fingers:
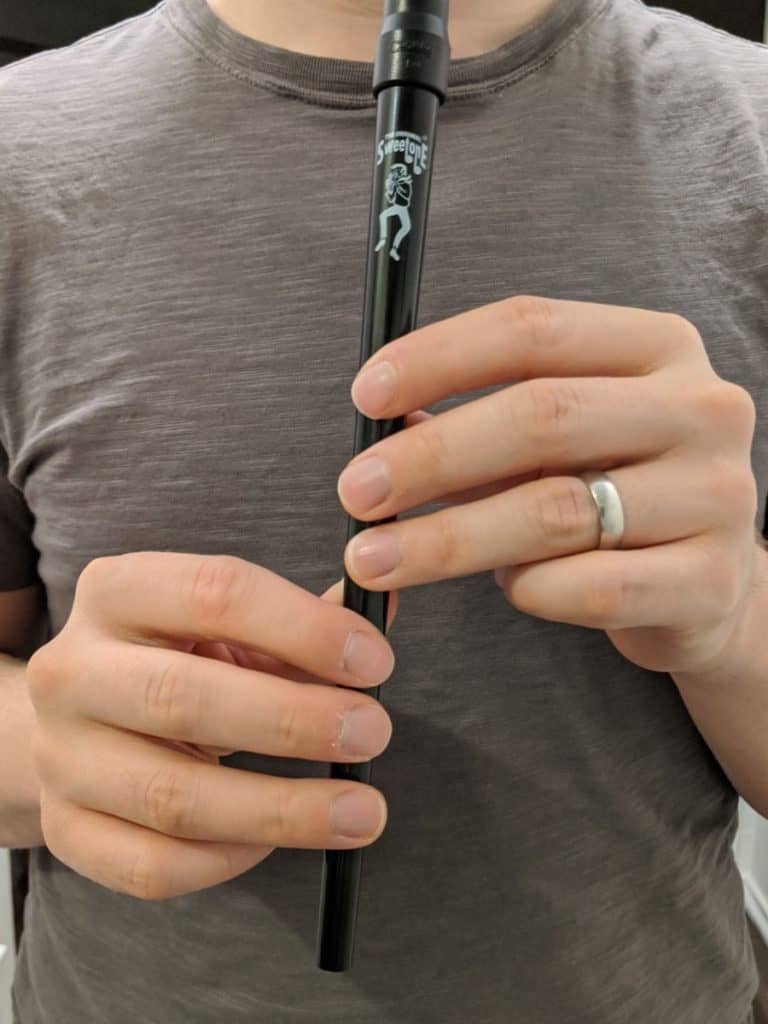
I can speak from experience: when I am having a long practice session, if my fingers aren’t straight, I can feel that arthritic pain (the same as if you are using a hammer or any other tool you hold on to) that comes from holding something too long.
Here’s an example of a natural finger arrangement that won’t hurt your fingers:
Tonguing
Here’s the scoop on tonguing.
Almost every wind instrument (including brass instruments) that most people are familiar with how to use tonguing techniques as a way to provide separation between notes.
Tin Whistlers definitely can use their tongue while they are playing, but in traditional Irish music, tonguing is either not used at all or only used rarely.
Does this mean you shouldn’t learn it? Well, of course you should! You’ll be able to play contemporary music and other folks genres a lot better if you have good tonguing technique. I’d say that learning how to tongue while playing a wind instrument is a critical skill.
How To Tongue on the Tin Whistle
Tonguing is actually not very complicated, because thankfully we practice tonguing in our normal speech all the time.
The fundamental action is making a “te” sound with the tip of your tongue. “Tip of your Tongue” is actually a good phrase to get the feel of what a Te should sound and feel like.
“Te” is the basic sound, but there are actually a lot of variations on this concept depending on what instrument you are playing.
For example, trumpet players tongue almost to the edge of their teeth, making a sort of a half “th” sound.
For the tin whistle, the fipple (mouthpiece of the tin whistle) is making the vibration, while you are just providing the air. So instead of a “th” sound, you make a “te” sound. Or you could even say a “doo” sound.
Whatever pronunciation you use, the goal is to get a clean separation from note to note. If you feel like your tonguing sounds muddy and the notes are blending together, try to sharpen your “te” by using only the tip of your tongue to cut off the air.
Double Tonguing
Double Tonguing is probably not something you’ll find yourself doing on the tin whistle very often. But occasionally, if you have the need to tongue consecutive notes very quickly, double tonguing can come in handy.
The premise of double tonguing is to “rock” back and forth between one side of the tongue to the other, allowing for more rapid tonguing.
If you say the sounds “te” and then the sound “ge”, you can feel how the tip of the tongue is used for the te and the back of the tongue is used for ge. Both of these sounds cut off the air blowing through your mouth which provides the separation you’re needing.
As an exercise, try repeating “te” and “ge” slowly and build up speed, this will demonstrate the technique very well for your muscle memory’s sake.
Vibrato
Vibrato is the concept of a making a pitch waver in a smooth wave. Vibrato can be made more or less intense by the frequency of the pitch waver. Think of classical opera singers, their singing vibrato is very intense because they are wavering quite quickly.
Vibrato is often made more pleasing when the pitch wavering (also called modulation) is done to the beat of the song, although it doesn’t need to be exact.
Another aspect of vibrato that is used differently in different styles of music is when to apply vibrato. If you apply vibrato as soon as you are at the point of the note where you are holding it (also called sustain), then this is similar to how many sing opera.
A contemporary style of vibrato is when you hold the note steady for a few moments and then slowly adding vibrato to the tone until the next note or when you release it.
Tin whistlers can pick the style of vibrato (it any at all) for their own personal style, or more wisely, understand the feel of the song they are playing and choose to use or not use it.
How To Achieve Vibrato On the Tin Whistle
There are actually a lot of ways to achieve vibrato. If you want a stunning demonstration of the different vibrato types, check out this video here:
The Diaphragm
One straightforward method for vibrato on the tin whistle is to use the same method of vibrato that is used in singing: the diaphragm.
The diaphragm is compressed and released while breathing to achieve gentle changes in breath pressure.
The easiest way to learn this is to exaggerate the sensation. Lie down on your back and put your hand on your upper tummy area, and say a deep hah! Play around with this sound (you might want to do this while noone is home if you are concerned about people’s perception of you) until you can feel your diaphragm compressing.
Practice strong and gentle compressions of the diaphragm until you have control of it. Next, apply the tin whistle.
Play a single note and hold it. While holding the note, apply the same diaphragm compression sensation you felt before (making that hah sound from your diaphragm). The trick is to do this gently so as to not burst to a higher note. If you do this right you should hear a slight change in pitch.
With some practice, you can make these gentle pitch changes evenly, thus creating vibrato.
The Jaw
This creates another pleasing vibrato. If you’ve ever chewed food before, you will likely be able to get the hang of this method.
Play a note, and then drop your jaw, and then close it again as if you were chewing something especially chewy. You can modulate the pitch nicely using this method.
Covering the Holes
The video above doesn’t mention this, but this method works especially well for low whistles and not as well for higher whistles. But, you can still get a similar effect.
To see someone using this type of vibrato in action, check out this video:
If you approach one or more open holes while playing, you’ll notice a change in pitch. This can be tuned and controlled carefully giving you the ability to achieve vibrato.
Glissando
A Glissando is a continuous and smooth pitch modulation between two notes. In normal person speech, a Glissando is when you slide from one note to another.
One of my favorite techniques that you can do on all fipple flutes, including the tin whistle is to slowly slide from one note to another.
A slur is not a Glissando. A slur is when you go from one note to another without a definite separation (usually made by the tongue in most wind instruments).
If you are having trouble imagining a Glissando, just imagine a trombone player playing continuously as they pull in the trombone slide. (I’m not sure why that is always what I think of when I think of a Glissando.
How To Do a Glissando On the Tin Whistle
A Glissando is easiest to do between two adjacent notes on the tin whistle.
Start in G position:

So your first three fingers of your left hand should be covering the top three holes of the tin whistle. Now, start playing G. Now, slowly uncover the third hole (your left ring finger) until you are in A position. If you uncovered the third hole slowly enough, you just did a Glissando. In fact, the Glissando is more pronounced the slower you uncover the hole.

In summary, to perform a simple one note upward Glissando on a tin whistle:
- Play a note
- Slowly uncover the fingers you need to play the note you want to transition to
- Play through the transition until you are at the next note
I really love the sound, so I have to remind myself not to try too many Glissandos because I’m sure they lose their charm if you use them all the time.
Half-Covered Holes: How To Play More Notes On the Tin Whistle
The tin whistle is a diatonic instrument, meaning it is designed to play the notes of one scale. Often there are some alternate fingerings to give you another note, which gives you another scale, essentially. However, the tin whistle can play all notes with a special technique: half-covering holes.
Instead of fully covering the fingering holes, you can cover them partially (not necessarily exactly half)
How To Half-Cover Holes on the Tin Whistle
There are two methods to half-cover the holes for the tin whistle, you can either:
- Roll your fingers vertically (parallel to the tin whistle shaft lengthwise)
Roll your fingers horizontally (perpendicular to the tin whistle shaft lengthwise).

This is a little tricky to visualize, so I’ll show you what it looks like normally and then the two methods for this technique:

For method 1, you can twist your finger towards the tin whistle fipple (mouthpiece) to only obscure part of the tin whistle hole. It’s a very subtle movement
Method 2 is done by straightening your fingers, which effectively rolls the pad of your finger so you are obscuring only part of the tin whistle hole, making a vertical gap across the tin whistle hole.
You may find that with certain fingerings or even in certain rhythms that one method will work better than another. Don’t feel like you have to do one or the other.
This is an advanced technique. Even though it’s not hard to do in isolation, mastering this technique in the middle of a reel is very challenging. Getting good intonation requires lots of practice and understanding the feel of your tin whistle.
Ornamentation
This is the big one. While the rest of the techniques in this article apply to the tin whistle, these techniques also only apply to several other instruments. However, these ornaments are unique to the tin whistle. Perhaps similar techniques are used on other instruments, but these techniques are a crucial part of what makes a tin whistle a tin whistle.
In traditional Irish music, the tin whistler did not separate music with the tongue, but instead separated the notes with their fingers, similar to how a bagpipe player would.
Really, you could have pages and pages just about ornamentation, because there are many different types, approaches, and exceptions in technique. I’ll cover two of the more approachable (and essential) techniques:
Cutting
Cutting is the concept of using a higher note to subtly introduce a lower note.
A cut is different than a strike in that the note you are adding is more sharp and obvious.
How to Perform Cutting
I’m not going to lie, cutting is hard for me.
You are essentially adding a very quick note that is above the note you are playing right before the note you are playing. Unlike striking, you often are not cutting with an adjacent note. For example, two common places to cut is as follows:
- In the 1st octave: for G and below, cutting with A
- For A and above until C#, cutting with C#.
Striking
Striking is the concept of quickly playing the next note below the one you are playing.
This isn’t a 32nd note–this isn’t a really a distinct note that you can really hear, rather, a strike is an effect to shape a note and make it more interesting.
A great place to put a strike is during a long note. Rather than holding the note for its entire duration without interruption, you can place a strike in the middle of the note.
How To Perform a Strike
A strike is kind of a misnomer, since you really are quickly covering the next hole down very softly and releasing just as quickly. It’s just a quick tap, and it makes a nice break in the note you are playing.