This post contains affiliate links. We earn commissions if you purchase products from retailers after clicking on a link from our site. As an Amazon Associate, we earn from qualifying purchases.
You’re probably here because you’ve listened to some amazing tin whistle players or maybe you’ve watched some Irish Sessions on YouTube and thought “wow… the tin whistle sounds amazing!” Then, when you excitedly buy your own tin whistle, you instead hear squeaks, squeals, or shrieks and think: ‘”why does my tin whistle sound so bad?”

By the way, looking for recording equipment and musical instruments? Check out Sweetwater.com for microphones, monitors, audio interface or any other recording gear that you could ever need. (Affiliate Link)
I experienced this same thing when I picked up the tin whistle. That’s the reason why I’m writing this post–to pass along all that I’ve learned since then to make your tin whistle playing sound better.
1. Check For Mouthpiece Defects
Perhaps one of the easiest ways to improve the sound of your tin whistle is to fix any issues it may have.
Inexpensive tin whistles are made in huge batches, and because they are made in mass and sell for less than $20 it’s common for these types of tin whistles to have small defects–some of them (luckily) that are easy to fix.
Windway Obstructions
Look through the bottom of your tin whistle towards a light and pay special attention to the slit of light coming from the mouthpiece (called a fipple on these types of flutes).
The thin light of light going through the fipple should have no obstructions–it should be a clean rectangle without any obstructions.
Since many inexpensive tin whistles are plastic and made by a process called injection molding, it’s common for them to have small pieces of plastic blocking the windway where you don’t want them to.
Use a needle or an electronics screwdriver to clear any obstructions in the fipple and you’ll immediately see a difference in your sound.
Leaks
Very often the mouthpiece on inexpensive whistles is actually glued on to the bore of the whistle. It’s possible that the seal on the whistle is not complete. This is a terrible thing, unfortunately, for the tin whistle’s sound. You can try adding epoxy to try and seal up the mouthpiece, but you may be looking at a new whistle if your own gluing doesn’t work.
2. Play It Don’t Spray It (the Super Straw Method)
A common mistake for beginners is to blow through the tin whistle with a larger column of air. This larger column of air picks up a lot of saliva on its way out of your mouth and into the windway of the tin whistle. Saliva in your tin whistle will dramatically interfere with your tin whistle sound.
This is a problem with every tin whistle on planet earth. Some tin whistles “clog” (another term of describing the effect of saliva blocking the windway) easier than others, but it’s important to try and minimize this problem with any tin whistle you get.
To clear the windway, you have two options:
1. Flick the tin whistle by the bottom of the tin whistle bore
2.(the more polite way) You can cover the ramp hole (the part of the tin whistle that makes the sound) and blow a quick burst of air to clear the whistle.
To minimize saliva going into your tin whistle, you have to shrink the diameter of the column of air. Your mouth has glands that constantly produce saliva, and therefore your mouth is always a moist environment. If your air goes over your entire mouth, then it will pick up more moisture.
A really easy way to improve this is to use the Super Straw Method.
Imagine you are blowing through a straw as you are blowing through the tin whistle. The air is now travelling in a narrow column and is therefore covering less of your mouth, and is therefore scooping up less moisture. You still will have some saliva travelling through the tin whistle (it’s inevitable), but this will decrease the saliva effect tremendously.
3. Cover the Holes Completely
A tiny gap in the fingering holes can destroy your sound! It’s kind of an unfair thing that such a small part of the tin whistle can make such a tremendous difference.
The most difficult part of this is that there isn’t a quick fix for this problem. It takes time to get used to the gaps between the holes and it takes practice to learn to cover the holes completely while your fingers are moving quickly through your songs.
Practice a song slowly and only play faster when you are strong and confident in your song. Rushing through a piece before you’re ready will not improve the necessary muscle memory to ensure those finger holes are always covered.
Proper Fingering Technique
If you’re having trouble with covering the finger holes, one easy thing to pay attention to is how flat your fingers are. Unlike piano, you don’t want to have curved fingers. Although a slight curve is natural, your fingers should be mostly straight. If you’d like, I took some pictures of what bad fingering technique looks like vs. better fingering technique. Check out my post about tin whistle technique here to see.
As far as which fingers to use where, you put your non-dominant hand on top and cover the first three holes with your index, middle and ring fingers respectively. Then, the bottom three holes are covered by your dominant hand with the same fingers.
Choosing the Right Tin Whistle (Or Getting Bigger Fingers
Now, if you’re still having trouble covering the fingering holes, you might consider a different whistle. Different tin whistles have different sizes of holes–low whistles especially have large finger holes. Whistles in a cone shape (such as Clarke’s Sweetone Tin Whistle) have smaller holes than cylindrical shaped tin whistles (like Walton’s Mellow D tin whistles).
If you’re having trouble covering the holes, try the type opposite the kind you currently have.
Sometimes smaller finger holes work better for some people while bigger finger holes work better for others.
4. Finding the Perfect Breath Pressure
If you’re worried about your tin whistle tone (and if you’re just beginning, it’s very understandable), then pay special attention to this section.
One of the biggest problems with tone is that when you try and play a note, you don’t play the note exactly and clearly at first. I always felt the word that describes this is squirrely.
So if you find getting to your note is squirrely, then you are experiencing issues with either your fingerings covering the note or finding the perfect breath pressure.
What do I mean? If you try and blow hard through a tin whistle, you’re going to get a sharp piercing note that will ring in your ear drums–and you’ll probably regret it. Many of the lower notes on a tin whistle require very little air. If you have just a little bit too much, your whistle will squeal and squeak and your family will tell you to go practice somewhere else.
The key here is to find the required amount of breath for each note and using muscle memory use that required amount of breath as you play each note.
This sounds crazy and impossible–but it’s not. And unfortunately, there isn’t a quick hack to get better at this, it’s simply a matter of practice. Don’t feel discouraged! I thought it was hopeless, but practice really helped my own skill in this come along.
On the positive note, there are practices that will help you improve your breath pressure faster.
Drills To Improve Breath Pressure
The difficult thing about breath pressure is not going from one note to an adjacent note–so simple scales are not going to help you here. What’s difficult is jumping between non-adjacent notes.
Those of you who have some musical training might already guess what you need to practice:
Arpeggios!
An arpeggio is a fancy Italian way of saying of playing non-adjacent notes in a specific pattern going up and down in pitch.
I’ll give you an example of an arpeggio you can start with.
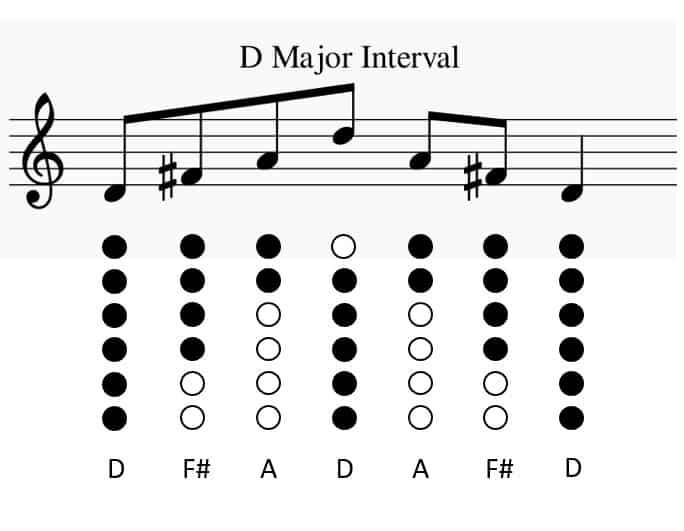
This is called a D Major Arpeggio–you are going up the first note, the third, and the fifth note of the D Major scale ending on the first note again an octave higher. These are excellent exercises for improving your breath control.
Once you master the D major arpeggio, start on the next note (E), and follow the same pattern.
Go for a 30 Degree Angle
You might have trouble controlling your breath pressure and you’re getting some extra squeaks. One thing to check is the angle of your tin whistle in relation to your mouth.
This of course will vary a little from player to player, but generally you want to shoot for a 30 degree angle. See the below image for an illustration
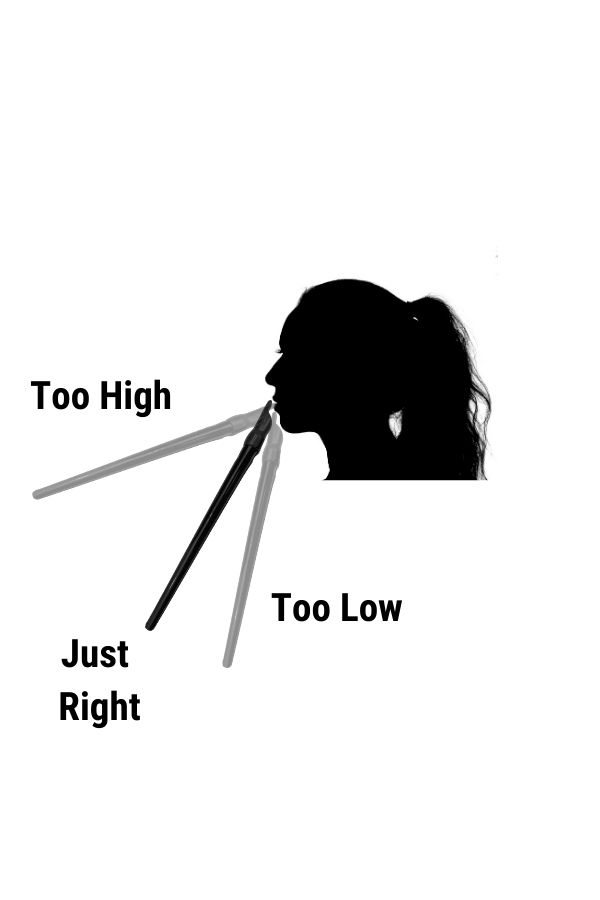
The sound of the tin whistle comes from the air vibration as it passes over and under the ramp through the windway. So, the angle at which the air approaches the ramp can make a huge difference in the sound.
The ideal is a controlled airflow that with the right breath pressure. Since the angle of the tin whistle affects airflow–if you are having issues with your sound, this is something to be aware of.
Try adjusting the angle to find something comfortable for you and that gives you the air support that works best for you.
5. Finding the Secret Fingerings
After you’ve learned the basic scales and are able to play the notes, you might find that some notes are out of tune and just don’t sound good.
This could be a simpler problem to fix than you might think. If one note is always out of tune, you might have not found the best fingering for that particular note on your particular tin whistle.
That’s right… a 2nd Octave D on one tin whistle might have a different fingering on another tin whistle.
For example, on my Clarke Sweettone tin whistle I played the 2nd octave D like I did the 1st octave D like this with all holes covered:

It wasn’t until later that I learned that the proper fingering for the 2nd Octave D was this for the Sweetone tin whistle:

With the 2nd fingering, the 2nd Octave D is more in tune for the Sweettone tin whistle.
Your tin whistle might have a note that will sound out of tune unless you find it’s own special fingering.
The fingering I mentioned above turns out to be the standard fingering that is most common–but I learned my lesson that although some fingerings will work, you’ll have to figure out what works best for your whistle.
For example, C Natural is usually expressed as this fingering:

But some report that this is out of tune on many whistles and that this fingering works better:

Play around and look for the fingering for that note that may not sound the best and it’s very possible you’ll arrive at a better sound.
6. Use a Stabilization Finger
Wow, this is such a simple thing to overlook–but having an extra finger on the bottom of the whistle to keep it stable can help your sound.
When you play C# (all finger holes open), the tin whistle is basically resting on your thumbs!
This presents two problems:
- Your tin whistle is precariously balanced making it easy to slip out of place
- Your fingers no longer have a reference point so when you try to put them back into place you lose precious time as your fingers look for the finger holes. This slows you down and is prone to cause some squeaking.
A stabilization finger is the answer!
If you rest your dominant hand’s ring finger fingering on the bottom hole for the notes above G (on a D tin whistle), or in other words, if you are covering two or less holes, then you’ll find that your tin whistle will have that extra stability you want, and your fingers have a place to stay in times of turmoil.
If you’d like, you can use your pinky finger on your dominant hand instead as your anchor–it doesn’t cover any holes, it just rests on the bottom of the tin whistle keeping it steady. This is uncomfortable for my hands but could work for your’s.
7. Warm Up the Whistle
If you feel like your tin whistle is out of tune when you start playing, you are probably right! Fortunately, this is very, very easy to fix. Simply warm up your whistle!
To do this, simply cover the ramp (to protect the innocent’s ears) and blow through the whistle for a few seconds–it doesn’t take long. This will help your whistle start in tune before you start playing.
8. Keep a Clean Tongue
Tonguing is a technique used for wind powered instruments to give separation for the notes. For example, making the sound “te” with the tip of your tongue is an example of the technique.
Tonguing isn’t used for the most part in traditional Irish music with the tin whistle, but it is for other styles. In order to make a good sound, it’s important for the tonguing sound to be clean and distinct.
Sometimes, the tonguing sound can be dull and thick sounding, which gives a feeling of sloppiness and drags down your notes.
Fortunately, making your tonguing sound clean isn’t impossible! All you have to do is be intentional in your practice.
Even though when someone says scales people usually don’t think “fun!” They are the easiest way to clean up your tonguing. Practice them slowly and make sure your notes are clean and distinct.
Practice ascending and descending a scale in staccato (think of the sound “tut”, making the sound as short as you can giving the notes lots of separation. Then try accenting every note, almost as if you were building pressure behind your tongue until you release the pressure as you make a “tu” sound.
9. Find the Vibrato Balance
Vibrato is a powerful technique that can add emotion and dynamics to your song–that’s probably why it’s so common in so much of the music we listen to.
You have to be careful with vibrato. Why?
Vibrato is like garlic. It goes good in so many things, but it’s easy to go overboard. Too much garlic in your meal will make it so you only taste garlic–vibrato, if it is to be used at all, should be used tastefully. Like garlic!
Regardless of your culinary preferences, finding the right balance of vibrato in your sound can help you find the sound you’re looking for.
There are multiple methods of vibrato (for more details on each, check out my post on tin whistle technique). Here are a few examples:
- Raising your fingers up and down over the holes that aren’t making the note you are sustaining
- Using your diaphragm to create vibrato: lying on your back and using your belly to make the sound “hah” is an excellent way to get the feel for how to make vibrato with your diaphragm.
- Using your throat to create vibrato: not considered the ideal method of vibrato by many but it is definitely an option.
10. The Holy Grail of Tin Whistle Technique: Ornamentation
There is one big differentiation between those who learn the basics of the tin whistle and those who are masters: ornamentation.
The term ornamentation is a bit of a misnomer, because it implies that normal tin whistle playing is sufficient without it.
The thing is that tin whistle ornamentation is a hugely important part about what makes the Irish tin whistle the Irish tin whistle. Calling ornamentation unnecessary would be like calling pizza unnecessary in U.S. culture. (We all know pizza is fundamental to citizens’ of the U.S. identity)
Tin Whistle Ornamentation gives your sound that organic and rich feel that you hear when listening to a master of the tin whistle.
I admit I have not mastered (or even conquered the basics) ornamentation. It’s tricky stuff that some say requires years of practice to get the hang of. I don’t have the experience to tell you how long it will take, but I can say the earlier you start to try and get the hang of it, the better off you will be.
Don’t try to run before you can walk, I’m not recommending to try and figure out ornamentation right when you start–I just mean to slowly familiarize with it early on (like 5 minutes a day at the start) so when you’ve mastered the basics it’s not relearning everything you’ve already learned.
11. Tweak: Altering Your Tin Whistle Windway
The above methods that we’ve talked about are mostly to do with the player (and a little about tin whistle defects), next let’s talk about actually tweaking the whistle.
Before you grab the pliers and destroy your whistle, I have to disclaim that I’m not responsible for any damage you do your whistle–I suggest all other technique modifications before you get to altering your whistle.
Furthermore, if you are concerned about damaging your whistle, you are a sane person–there are some who are adept at whistle modifications. Jerry Freeman is legendary with his small modifications of inexpensive whistles that give a much more impressive sound. For more information about professionally tweaked tin whistles, check out the section below about buying a tweaked whistle.
The sound from a tin whistle comes from the oscillation of air over and below the ramp of the tin whistle inside the fipple (mouthpiece). The air channels inside the mouthpiece going into the bore of the whistle is called the windway.
Any changes to the windway will change your sound, since all of the action of creating the sound is here.
Some tin whistlers actually pinch the windway to alter the tone of their whistle as well as affect the tuning of the note. This is done by pinching the windway very subtly to get the desired sound.
If I had a recommendation here, it would be to use non-permanent changes first. One popular way to do this is to use mounting putty (a popular variant called “blu-tack” inside your whistle windway to alter and shape the sound. This is a fantastic way to experiment with this because you aren’t bending any metal.
12. Tweak: Reshaping The Ramp
Since the ramp is pivotal to the sound, some avid tin whistle tweakers reshape the ramp, either by filing the material down or by gluing a strong plastic ramp augmentation, essentially replacing the existing ramp.
These are destructive changes and there’s no going back.
13. Tweak: Lengthening the Bore
One of the complaints of the famous Mellow D tin whistle is that some notes are always out of tune. The Jerry Freeman tweaked “Mellow Dog” tin whistle, made from the parts of a Mellow D tin whistle actually has a bore extension on the tin whistle which changes the air shape and therefore the pitch of the instrument. (longer instrument equals lower pitch)
This is not as dangerous a change because you can figure out the perfect length of the bore and remove the bore extension if necessary.
Tool for helping tune
If you’re wondering how you can find the perfect tuning for your notes, there is an amazing free tool called Flutini for PC or Mac that can listen to you as you play a song and pick out the notes and their pitches–extremely helpful for finding the perfect modification.
14. Tweak: Make the Mouthpiece Tunable
Another tweak that is common is using almost boiling water to remove the plastic mouthpiece on many inexpensive whistles by loosening the glue. With a brass insert or some other modifications you now have a mouthpiece that can slide which means you can now tune your whistle!
15. Buying a Tweaked Whistle
Jerry Freeman as mentioned above, is an amazing tin whistle tweaker. In the tin whistle community his tin whistles are revered as very inexpensive whistles are modified to add features found on enthusiast or even professional level tin whistles. Check out his ebay store here.
Some of the features he adds are:
- Tuning notoriously out of tune whistles
- Creating a mouthpiece slide so you can tune the tin whistle to play with other instruments (this is super cool!!)
- Modifying the ramp to strength the sound
- Replacing components that often give out on inexpensive whistles so they last longer
Anyway–I’d get one–he’s not going to be modifying whistles forever.
16. The Last Resort: Changing Whistles
So, my first whistle, the Clarke Sweetone I thought was an inexpensive whistle that I had no hope of improving its sound. I had been practicing it daily for an hour for a couple of weeks and I just assumed that the sound I had was the sound it could give.
I then stumbled on YouTube on this tin whistler:

Although she uses a bit much of vibrato for my own personal tastes, I quickly realized that any complaint of the sound of the tin whistle was in my own power to solve with technique.
Don’t give up, find others who play your tin whistle and determine if you have room to practice and improve your sound.
If you’ve decided you’ve outgrown your whistle, I’ve created an in-depth buying guide that shows the range of quality of tin whistles that you might consider in finding one that suits your needs. Check out the tin whistle buying guide here.
Good luck on your quest!