This post contains affiliate links. We earn commissions if you purchase products from retailers after clicking on a link from our site. As an Amazon Associate, we earn from qualifying purchases.
It took me so long to figure out what compression in audio terms means–but after exhaustively researching the concept, I not only figured it out, but I also figured out a way to understand it that will help you, immensely.
Explained like you’re new to music production: In music, compression is the process of lowering the amplitude of the part of an audio signal that’s above a certain dB threshold.
Explained in simple terms: Audio compression makes loud parts of a sound quieter.
That’s a well and good description but read on to find out how you can actually understand it.
This analogy is finally what made it click for me.
What Is a Compressor?
An audio compressor tweaks the volume of a particular sound in the following ways (the options vary from one compressor to another):
- Input Gain: The amplitude of the sound signal going into the compressor before processing
- Output Gain: Gain that is applied to the sound signal after processing
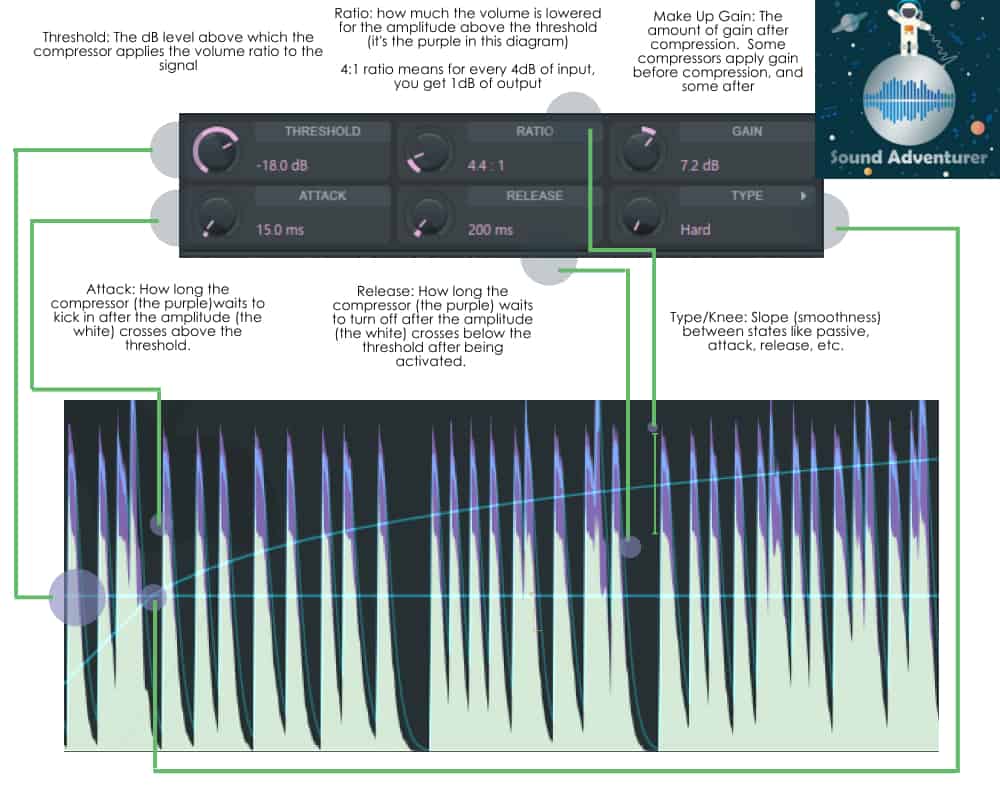
- Threshold: The dB level above which the compressor applies the volume ratio to the signal
- Ratio: How much the volume is lowered for the amplitude above the threshold. A 4:1 ratio means for every dB of input, you get 1dB of output
- Attack: How long the compressor waits to kick in after the amplitude crosses above the threshold
- Release: After the compressor is activated, release is how long the compressor waits to turn off after the amplitude crosses below the threshold
- Knee: Slope (smoothness) between states like passive, attack, release, etc.
That’s a lot to take in, it didn’t make sense to me after seeing all of this. Read on to learn the nuances as well as a super great analogy to put it all together.
Audio Compression Analogy
If you’re like me, you might kind of halfway understand what all of that means… This analogy is finally what made it click for me.

So, imagine you’re a super spy. Cool right?

You’re at a dinner party in a large room with 9 tables.
You’re sitting at a dinner table with other people.
Some tables are several steps away, and some are across the room (out of earshot).
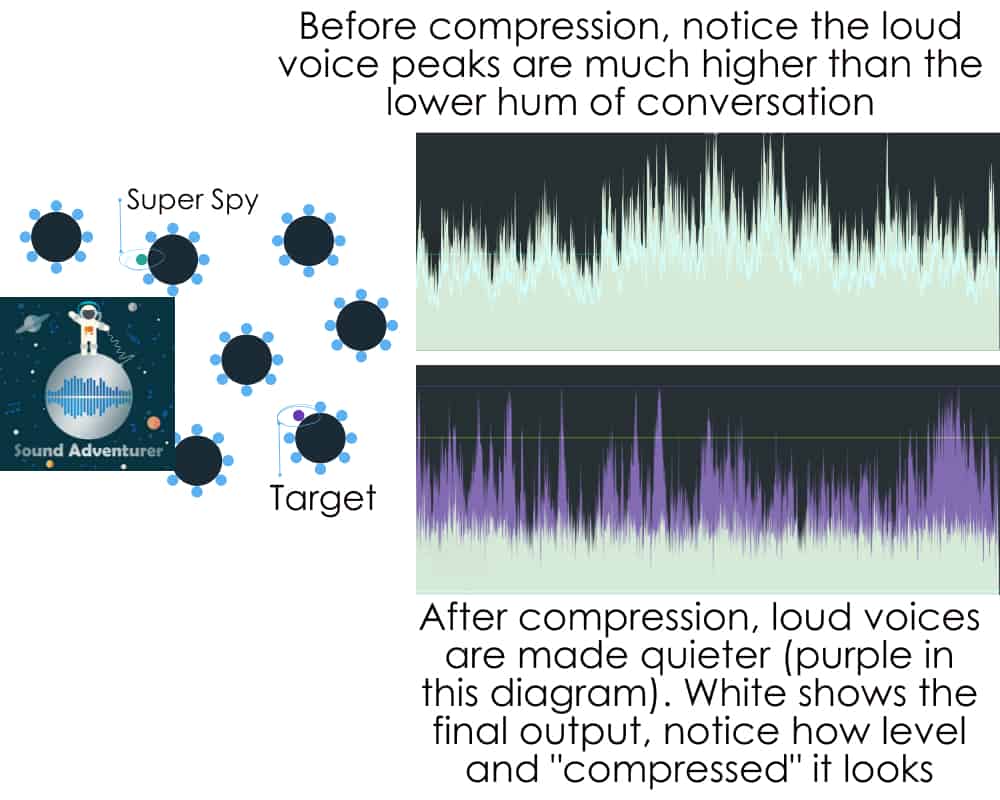
Since you’re a spy, you want to be able to hear what’s going on at all the tables, particularly one–so you pop in your almost invisible headphones and then turn on your Super Spy Audio Compressor (SSAC, patent pending).
Using your SSAC, you can boost the volume of the quietest voices that are farthest away from you while simultaneously turning down the volume of the loudest voices closest to you. You can now listen to everybody in the room.
A compressor makes the loudest noises quieter and can boost the sounds that are quieter so they are louder.
In this analogy’s terms, the super spy’s audio compressor makes the voices at the table you’re sitting at quieter (relatively) and boosts the volume of the voices of the people sitting at tables further away. So now you can listen to people who are sitting across the room.
Summary points to drive this home:
- After compression, the quiet sounds will sound louder because relatively they are louder in the mix
- After compression, you can boost the flatter signal so you can hear the quieter parts of the mix even better
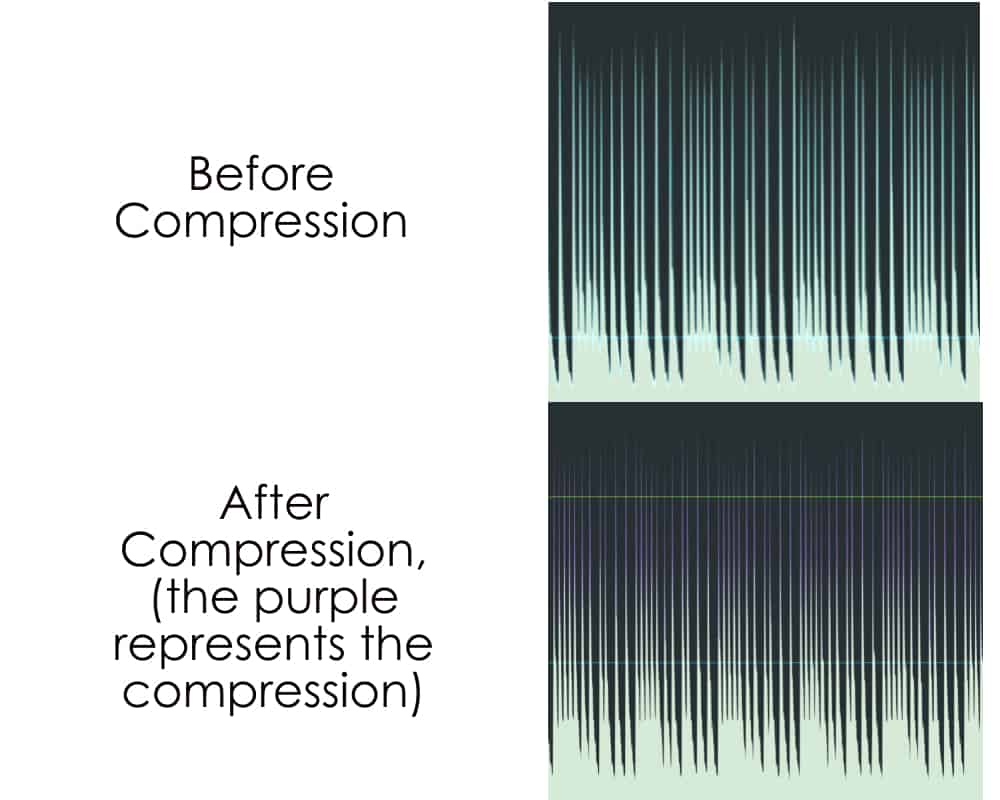
- The term compression is easy to understand once you can visualize the audio signal of an aggressive compression because the sound signal no longer has strong peaks and looks flatter. It looks more “compressed”
Super Spy Analogy TL;DR: The spy armed with an audio compressor can listen to a conversation far away because they can make louder sounds quieter and boost quieter sounds.
What Is The Purpose Of Compression In Music?
A music producer uses a compressor to make soft parts of the music louder without boosting the louder parts of the music.
In more produce-y terms, a compressor is used to reduce the dynamic range of a song. Click here if you want to know what dynamic range is. There are lots of reasons why someone would want to reduce the dynamic range–I’ll give a few reasons why you’d reach for a compressor in music.
A Lower Dynamic Range Sounds Louder
Louder music sounds better to us. Part of what sounds “loud” to our ears isn’t necessarily the amplitude, although that certainly is a factor, but rather the average amplitude over time. In other words, if you hear a loud blip that lasts a quarter of a second, or if you hear the same loud blip that lasts 5 seconds–the 5-second blip will sound MUCH louder even if they are the same amplitude.
Therefore, if your piece has really high amplitude mixed with lower amplitude, your brain perceives the song overall as being quieter, and therefore not as interesting.
If, on the other hand, you have a lower dynamic range and you boost the output gain, your brain hears a more consistent volume. Even if your dB meter is registering lower after compression, your brain can perceive it as being louder.
Even after that, producers will often use make-up gain to boost the entire signal, further increasing loudness.
Longer Sustain
Sustain is what gives instruments their depth. If there is no depth to our voices it sounds like we’re talking into a hat.
One simple way to increase the sustain of an instrument is simply to compress it and adjust the threshold so that the quieter sustain can be boosted and thus be more perceptible.
Here’s an example of a compressed piano where I tried not to change the final peak volume, but you can hear a lot more sustain:

Punchier Sound (especially for drums)
Now, this is where music producers use those terms that don’t seem to make any sense–until you become a producer and you say those drums aren’t “punchy” enough because it’s the only way you know how to describe it.
Producers often use compression to make drums sound more punchy. More “in-your-face”. It’s because drums that have a high dynamic range sound weaker and less present in the mix.
I’ll give you an exaggerated example with a bass drum.
If you’re like me, you may be undecided about which one is “better”. However, for the sake of learning, if you listen closely you notice that in the “before compression example,” the bass drum signal is very present at the very beginning (called the transient), and dies off very quickly. The compressed signal has a lower dynamic range and doesn’t have this drastic volume change.
This depends on your own tastes–but producers often use compression to make their drums sound more punchy (and that is the term you’ll hear).
Getting Rid of Transients (Or at least toning down the transients)
Transients are those “spikes” in your signal that represent brief high-volume parts of your audio.
Sometimes these transients are desirable. Often instruments, like drums, have a sharp transient at the beginning of the sound and it’s part of the sound. Even instruments like trumpets and guitars have transients at the beginning of their sound.
Sometimes transients are not desirable. Or you may want to tone down the transients so they are not so obvious.
Compressing an audio signal will shrink the difference between the transients and the rest of the waveform. You can see an example of this in the Bass Drum Compression example (just before this description)
Removing Clipping (Limiting)
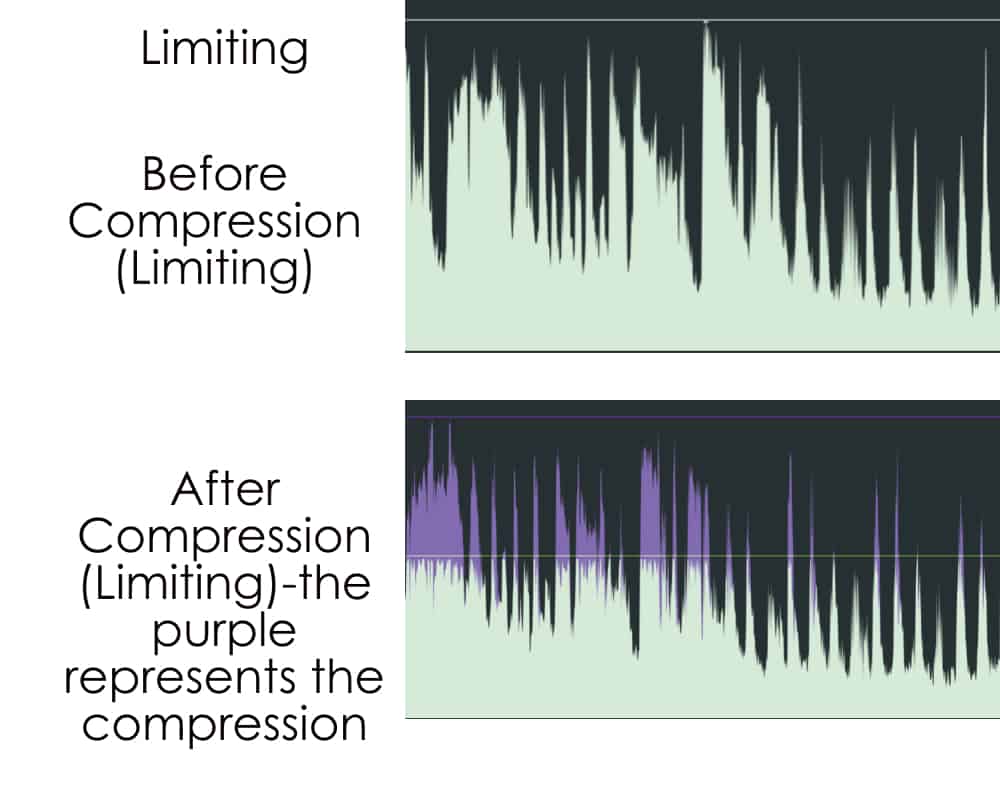
Lastly, compression is used during “Limiting“. Limiting is simply using a compressor as a way to prevent clipping.
Clipping is when your sound signal goes above 0db. This is beyond the reproduction volume of digital sound, and if you clip, you’re going to hear pops that are really terrible sounding.
Limiting will compress the sound so that it won’t peak above 0db. If you limit at too low a threshold, or if your volume is too high, your sound quality will suffer.
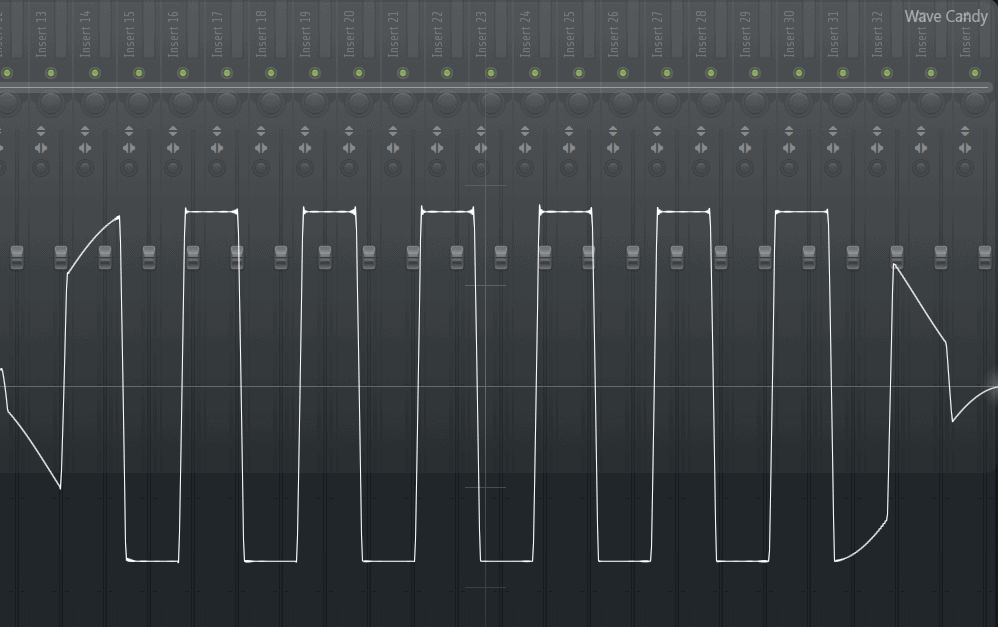
Here’s an example of very obvious limiting. It kind of looks like a flat-top haircut.
I want you to hear what this sounds like–this limiter is WAY too aggressive, and so the sound and timbre of the instruments are affected.
So that’s not an example of WHAT to do, but rather in why it’s used. Often all of these tools are used in ways that are extremely subtle and difficult to tell you side by side which is better.
What Else Can A Compressor Be Used For?
Audio compressors are not just used in music, as you can imagine, I’ll share a couple of examples of how they’re used:
Recording an Interview/Podcast/Audiobook
Recording audio is difficult. The reason why it’s difficult is that you have to tweak the input volume just right or you get peaking. Peaking can distort and ruin your audio. We’ve all heard it and it’s a quick way for us to want to stop listening.
Furthermore, a speaker’s voice volume can change rapidly. Your interviewee can get particularly passionate about a certain topic and their voice can raise in volume. You as the interviewer have to adjust the volume just so it’s not too quiet and not too loud.
Compressing your audio is one way that makes this easier. Using compression, you can make the too-loud parts quieter and bump up the volume of too-quiet parts, making a more consistent waveform.
Compression can be used much more aggressively for an interview rather than music (for voices) because the importance is more on whether you can hear and understand the speaker and not so much whether their voice sounds a bit weird from the compression.
Making Your Own Videos
I’ll tell you if you’re not compressing your audio in some way for your videos, then you’re making life harder for everyone. Compressing your audio in your video will help your sound be more level and consistent.
Making a video is hard and it’s very difficult for everything in your video to be the same volume. Sometimes you move away from your mic, or sometimes you have something in your video that makes sound and it can be much louder or quieter than everything else. Applying a limiter to your entire video’s audio can do the trick to make everything much more even in your audio.
How To Use a Compressor In a DAW?
This is the nitty gritty–these instructions are actually how to use a compressor in a DAW. You’ll see how each of these affects the waveform as obviously as possible. You’ll be able to look at this section and understand how to use a compressor.
I’ll be using the limiter plugin from FL Studio because its visuals are so brilliant.
What Is Output (Make-Up) Gain On A Compressor?
Gain that is applied to the sound signal after processing
So changing the output gain of a signal during compression is completely optional. As far as the compressor technology is concerned, its job is finished! The compressor has compressed the signal.
However, a tool that’s often used is called output gain (or sometimes make-up gain). Essentially the producer may want to boost the amplitude of the signal after compressing it so that the entire compressed signal is louder.
A picture will help you see this:
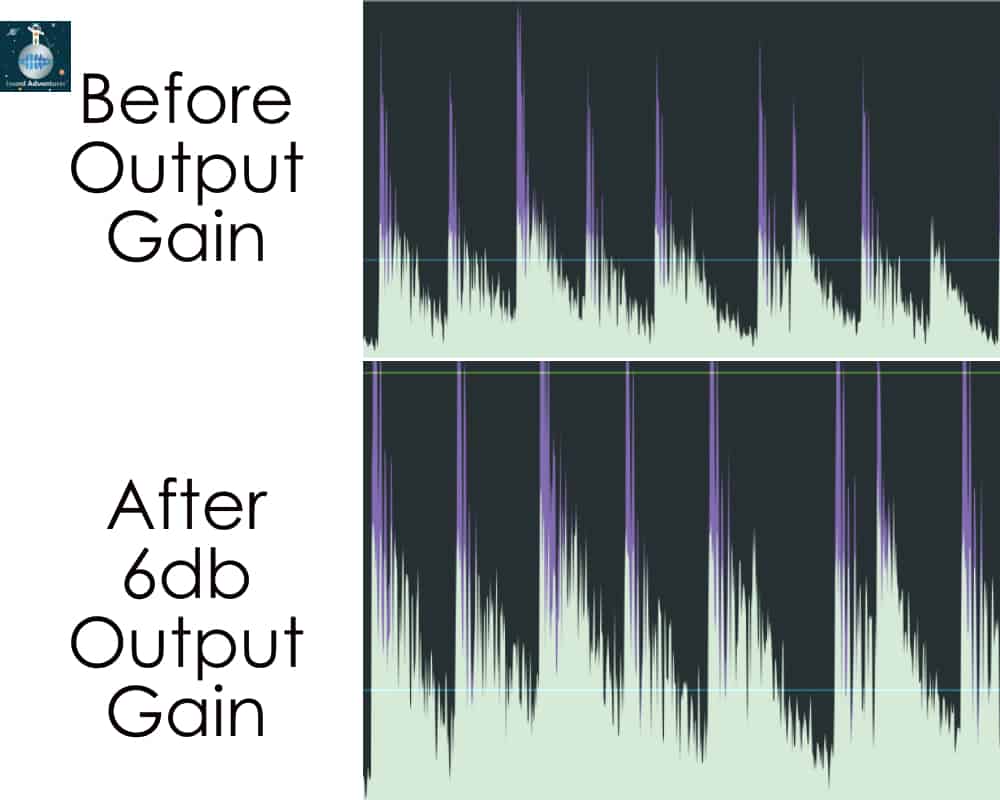
As you can see the white output peaks are much bigger. It essentially looks like a taller version of the “Before” waveform.
But that’s important to understand, output gain doesn’t change the waveform like the other controls, it’s simply boosting the entire signal (irrespective of the threshold).
The difference between output gain and input gain is that output gain is AFTER the compression while input gain is BEFORE the compression.
What Is the Knee In A Compressor?
Slope (smoothness) between states like passive, attack, release, etc.
Knee is probably the most difficult thing to explain as far as how a compressor works, but it’s basically how quick the compressor transitions between full compression and non-compression and back again.

A “soft knee” means the transition between no-compression and full-compression will be more gentle and smooth (it will also take slightly longer).
A “hard knee” means the transition between no-compression and full-compression will be more abrupt.
It’s difficult to hear the difference, I’ll let you listen and see if you can tell:
To tell you the truth I think I can only tell a difference in this particular sample because I know there is a difference, I definitely would not be able to tell you which is which without knowing ahead of time.
What Is the Threshold In Compression? (Gain Reduction)
The dB level above which the compressor applies the volume ratio to the signal
In normal person speak, this is the dB level in which the compressor kicks in.
Amplitude is expressed in -dBs in music creation. -60dB is a barely audible amplitude, while 0db is the “max” volume.
It will help if we can see what we’re talking about here:

The blue horizontal line in these visuals is the threshold. The lower the threshold, the more compression occurs. Notice how at -0dB the threshold dial is all the way up. This is as high as this compressor is set to go. Notice how at -24dB that the threshold is almost all the way down, this is a very aggressive compressor setting.
Just for fun, you can listen to the compression at 0db (in this case, no compression) vs. -24db compression with an 8:1 ratio:
Notice how terrible it sounds. Well, that’s a good example of over-compression, it demonstrates the principle of the threshold, though.
What Is Ratio In Compression?
How much the volume is lowered for the amplitude above the threshold. A 4:1 ratio means for every dB of input, you get 1dB of output
Ratio in a DAW compressor is simply how much volume to lower the sound that is over the threshold. The higher the ratio, the more aggressive the compressor.
4:1 is kind of at the top end of your day-to-day audio compression. Although you can see really aggressive 10:1 compression (especially with drums), that is getting into the realm of limiting, where you are not really trying to shape the volume curve as much as you’re trying to prevent any sound above a certain threshold.
Try and stick between 2:1 and 4:1 in your compression. Go above intentionally.
Let’s take a look to see what ratio looks like:
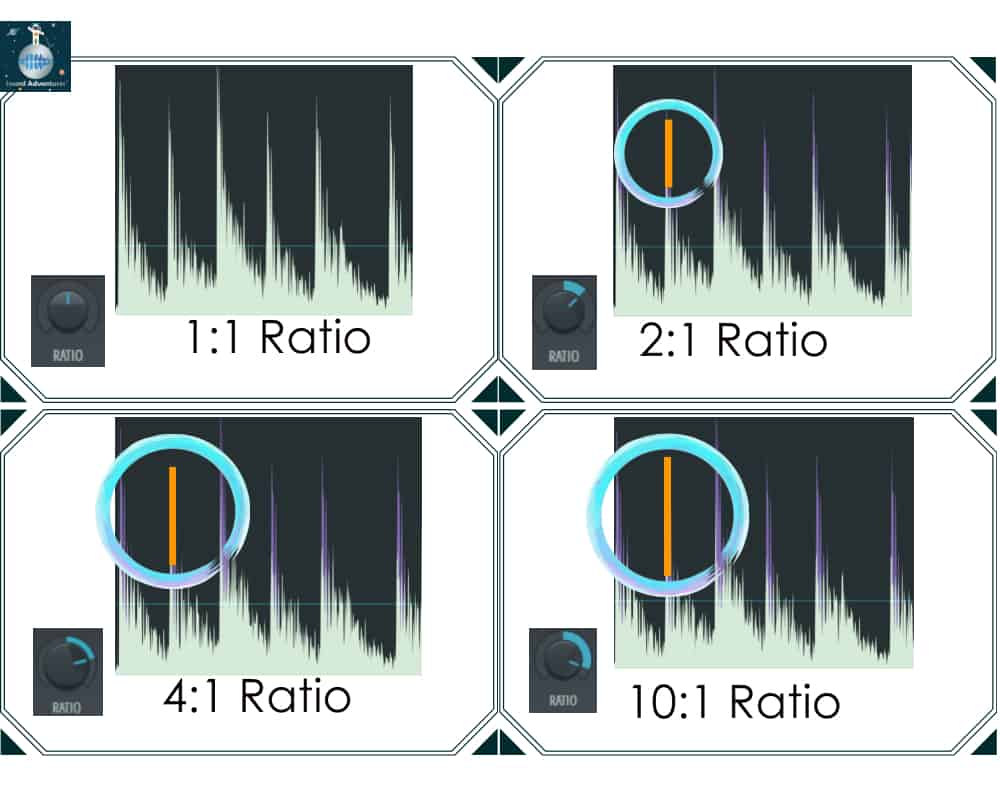
Ratio is a bit easier to see and understand in compression. It’s the size of the purple peaks in this diagram. The longer the purple (the more compression), the higher the ratio.
Let’s hear the difference between 1:1 ratio (no compression), and 4:1 ratio (mid-level aggressive compression):
Again, even here the difference is subtle if you’re not used to it, but I’m able to notice a big difference in the “thumpiness” of the bass drum. Also, the hi-hat doesn’t cut through as much as the high transients are being aggressively brought down.
What Is Attack In A Compressor?
How long the compressor waits to kick in after the amplitude crosses above the threshold.
Attack is usually expressed in milliseconds (ms), or 1 thousandth of a second.
Let’s see if a diagram can help us understand attack:
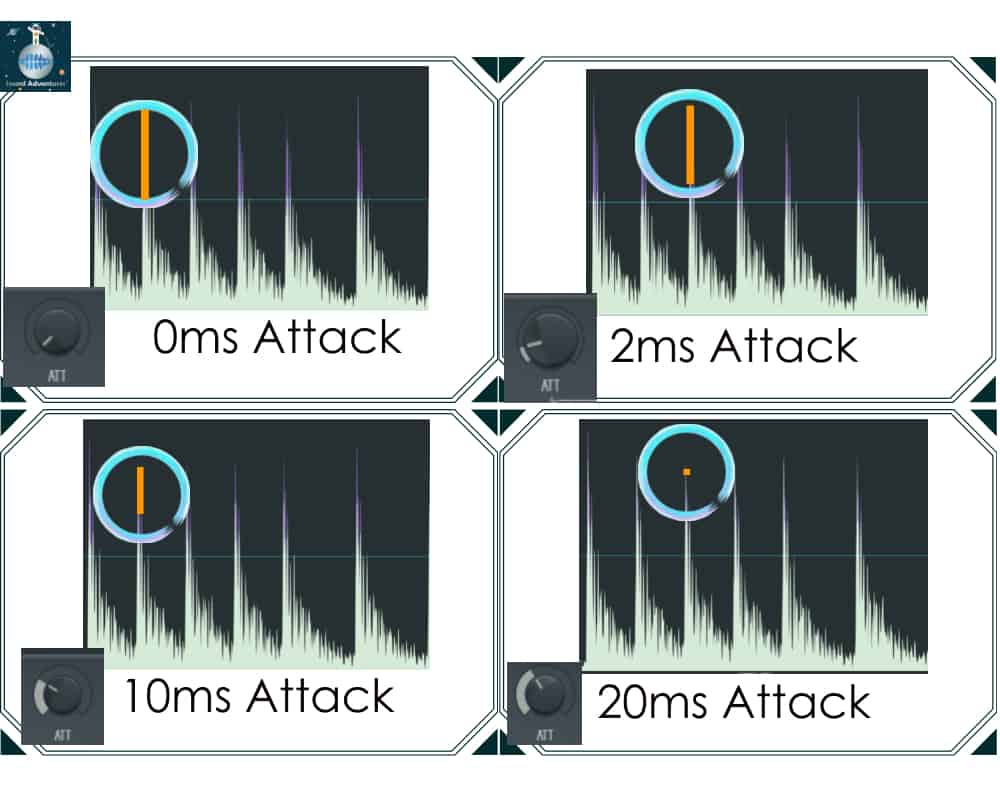
This one is a bit hard to see, but I’ve drawn some annotations to make it more clear. The PURPLE represents compression. The WHITE shows what final output signal is after compression.
The lower the attack, the quicker the compressor kicks in and so more of the signal gets compressed, therefore the taller the purple line (the orange line that I’ve drawn on these shows the height of the purple line).
Thus, with 20ms attack, the compressor almost misses the waveform altogether before it goes underneath the threshold. While with 10ms attack, more of the transient is getting through. You’ll notice with 0ms attack the signal stops right at the threshold.
Next, let’s do an audio compressor example of 0ms attack and 10ms attack compression on a bass drum. The difference is very subtle, but if you listen closely you can hear a difference in the transient (the sound at the beginning of the bass drum)
What Is Release In A Compressor?
After the compressor is activated, release is how long the compressor waits to turn off after the amplitude crosses below the threshold
Release is usually expressed in milliseconds (ms), or 1 thousandth of a second.
Let’s take a look at a diagram that will help us understand release.
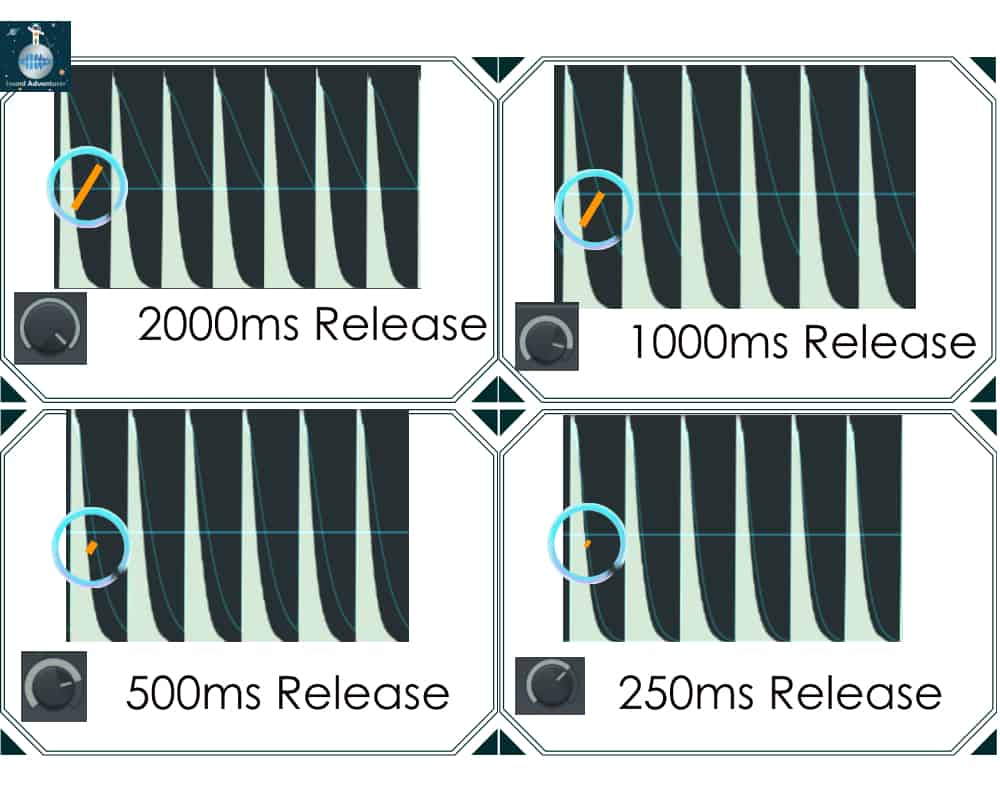
Look at the picture example above to see how Release works in a compressor. I have 4 different release values (in ms): 2000, 1000, 500, and 250. These are all very high for a compressor. If you notice, though, the blue sloping line represents how long the compressor is ACTIVE. The compressor becomes ACTIVE once the sound goes OVER the THRESHOLD (the horizontal blue line in the picture).
Release controls how long the compressor stays active after the sound goes above the threshold.
Notice how the release curve matches the sound curve (the white) in this picture.
In Practical Terms
A HIGH release means that the compressor will stay on even after the sound crosses below the threshold
A LOW release means that the compressor will turn off much more quickly after the sound crosses below the threshold.
Release can smooth out the sound of compression–if you hear your compressor being a bit too obvious and robotic, you can use a longer release so the compression isn’t as exact.
Is a Limiter the Same As a Compressor?
A limiter is a specific way of using compression that is made up of two things:
- An extremely aggressive ratio
- A threshold
When you’re using a compressor, it’s not atypical to use compression ratios of 4:1, which is considered moderate compression. A really aggressive ratio for an instrument would be 10:1.
A limiter takes this ratio up to the next level and goes as high as it can. A limiter can in fact make it so the ratio is infinite, in that no amount of gain will result in a louder signal.
That being said, you can use any compressor as a limiter by simply dialing the ratio as high as it can possibly go.
A limiter is simply a way to make sure you don’t have amplitude go over a certain threshold. In fact, it’s common for a limiter to be on a track where the threshold is 0db–which is the limit for digital sound reproduction. If you go over 0db you’ll be clipping, so putting in a limiter at 0db makes sense.
What Is Over-Compression?
Over-compression in music is setting too aggressive of one of the following:
- Compression ratio
- Output gain
- Input Gain
- Attack Time
Too-aggressive compression setting can cause distortion, loss of valuable dynamic range and therefore a poor sound, or a loss of important transients making your sound muddy.
Over compression isn’t a specific threshold or gain value–you might be looking for a specific sound and cranking the dBs might be exactly what you need to do!
In fact, distortion pedals that electric guitars use often use some form of compression to create an intentionally flat and distorted soundwave.
However, there are things that you lose (and gain 🥁 ba dum psh!) with compression/over-compression that you should be aware of and listen for.
Signs You Are Over-Compressing Your Track
Let’s go over some obvious signs that you’re over-compressing
Distortion Example
When you have a limiter preventing amplitude from increasing over a specific dB threshold, and then when you add gain to that already limited signal, the signal will broaden into different frequencies (harmonics).
(I’ve put a limiter on these samples to -10db. They are all the same amplitude)
This is a very basic sine wave with no frills:
That’s what this note sounds like, take a look at this picture to see what that looks like.

That’s what it looks like through the Oscilloscope–which gives us an idea of what the wave looks like. But what about a Spectrum analysis?
Notice how the note is only one frequency.
This is what distortion sounds like on the sine wave, notice how the wave is flattened and the signal broadens out: (Make sure you turn down the volume on your speakers since this sounds quite loud)
And this is what the signal looks like:
If you think this is interesting, check out our answer to the question about whether thicker guitar strings are louder, there’s a lot of discussion about this topic.
Too Low A Dynamic Range (Boring!)
Dynamic range is crucial to making a song interesting. But you gotta get it just right. Too much dynamic range can actually be difficult to listen to, where the listener has to adjust the volume themselves in order to hear the quieter parts of the song.
But too low a dynamic range can sound boring. What does that mean? If a song is loud the entire song with no break in energy, then this gets tiresome to the listener and it sounds boring.
I can think of no better example than to show you the difference between a hi-hat that’s at an even, consistent volume with zero dynamic range.
Compare that to a hi-hat that alternates between high and low volume each strike:
You can hear easily that the hi-hat with the higher dynamic range sounds more interesting. The same applies to the entire song. Vary the energy and loudness of the song throughout the song to make a more interesting song.
So in summary, be careful about over-compressing your sounds or music because you may be losing some important dynamic range.
Missing Important Transients
Another reason that over-compression can affect your track is if you are losing important transients.
This is super easy to do with drums. You want punchy drums so you compress the crap out of them, but then you might be losing that transient that gives the drum sample some of its bite.
Remember that a compressor works by lowering the volume by a specified ratio over a specific threshold. You can control when the compressor kicks in to preserve some of those transients using attack time.
If your attack time is 0ms, then that means your compressor is going to wipe out all transients at the beginning of the sound when you compress the sound. Anywhere from 2ms to 10ms is normal for compressing drums.
Tips For Using An Audio Compressor
Here are a few things to check in with yourself if you are using a compressor to adjust the sound of your instrument.
Close Your Eyes
A lot of tools have visualizations that help you see what you are doing to the waveform. Sometimes it’s helpful to look away from all of that for a moment so you can pay attention to the sound of the instrument.
Compressing something just to compress something isn’t a good enough reason, you should be enhancing the sound in some way (see the reasons to compress that I talk about earlier in this article).
Ask yourself these questions:
- Comparing before and after, is the sound better?
- Am I losing precious transients unnecessarily? (modify your attack and release if so)
- Does it sound more muddy than I want?
- If I’m trying to get more punchy, does it sound more punchy?
Think of questions like that to check in with yourself to make sure you’re doing the right thing.
Compress With All the Instruments Playing
Another mistake I fall into is to compress a sound in isolation. The reality is that your kick drum you’re trying to compress is not going to be played all by itself, but in the context of an entire production.
Apply compression and other effects both without all the instruments playing and again after all the instruments are playing. Make sure it has the desired effect in the context of the mix.
What Is Dynamic Range?
Dynamic range is a fancy way of saying the difference between the loudest part of a song and the noise floor.
There’s noise everywhere, even in an empty room with nothing going on. That’s called the noise floor. Riding on a train or being at the supermarket have a certain amount of noise–if there’s a noise that’s quieter than the noise floor, (for example, if someone 50 feet away is whispering to their friend about your funny shoes) then you won’t be able to hear it.
Therefore dynamic range = loudest part of the song – the noise floor.